Yorick's Resting Place Map Guide - Forsaken Roblox (2026)
Navigate Yorick's Resting Place in Forsaken. Complete cemetery map guide with tombstone loops, crypt hiding spots, and graveyard escape strategies.
Yorick's Resting Place is Forsaken's premier stealth-focused map, where tombstone rows, crypts, and fog-blanketed pathways create an environment built for concealment rather than traditional looping fundamentally shifting the survivor meta from raw chase mechanics toward patient, calculated hiding and repositioning strategies. The graveyard aesthetic is far more than visual flavor. Dense headstone rows reduce killer detection range by 20-30% compared to open maps, mausoleums provide hard cover with interior hiding spots, and perpetual fog effects obscure survivor silhouettes at distances beyond 15 studs. Players who adapt to this stealth-first philosophy achieve 57% escape rates on Yorick's Resting Place, compared to a dismal 40% for survivors who attempt standard looping on a map specifically designed to punish predictable chase patterns. Yorick's Resting Place rewards patience, awareness, and knowledge of its unique terrain features above all else. This comprehensive guide covers every tombstone loop pattern, crypt hiding technique, fog exploitation strategy, generator placement, and killer-specific counterplay that will transform this graveyard from a place of dread into your most reliable escape environment. For a broader look at all available maps and how Yorick's compares, visit our complete guide at /forsaken-maps.
Quick Stats: Yorick's Resting Place
- • Map Size: Medium-Large (10,200 sq studs)
- • Difficulty: Intermediate
- • Generators: 7 spawns, 5 required
- • Cover spots: 8-10 spawns
- • Fog Density: High (15-stud visibility reduction)
- • Hiding Spots: 30+ unique positions
- • Best For: Stealth-oriented survivors
- • Killer Win Rate: 48% (slightly survivor-favored)
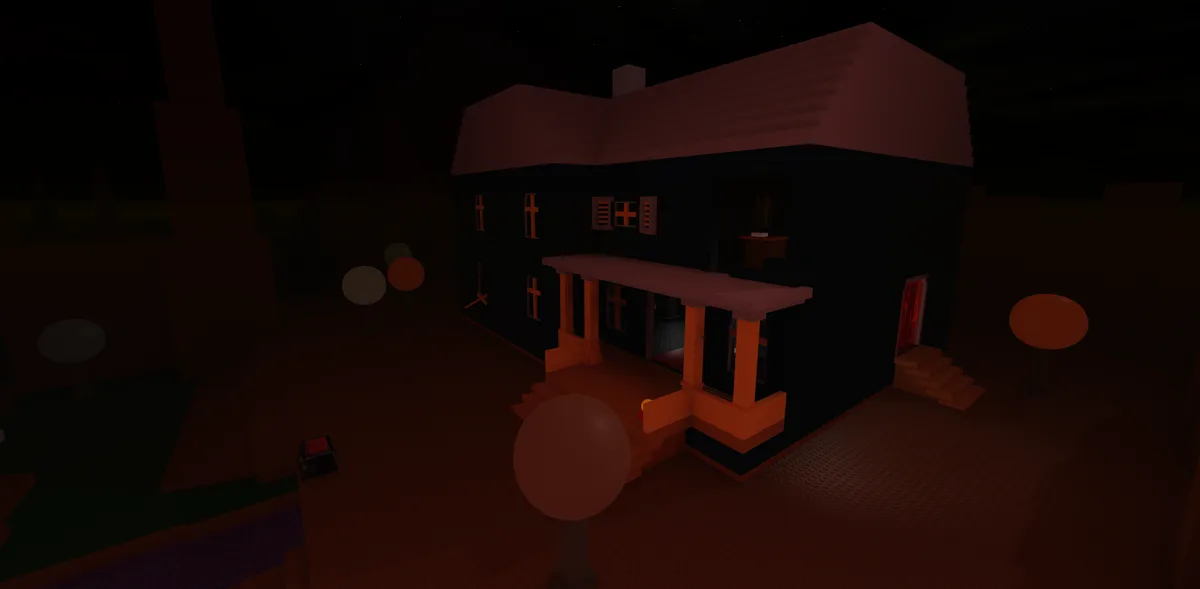
The Yorick's Resting Place map in Forsaken. Image: Forsaken (Roblox) © Forsaken Dev Group, via the Official Forsaken Wiki (forsaken.wiki).
Yorick's Resting Place Map Overview and Layout
Yorick's Resting Place is structured as a sprawling cemetery divided into four distinct quadrants connected by a central crossroads, with each quadrant offering different terrain features, cover density, and strategic value. The map spans roughly 10,200 square studs, making it slightly larger than most Forsaken maps. The perpetual fog that hangs over the graveyard fluctuates in density throughout the match, periodically thickening for 20-second windows that dramatically reduce visibility to around 10 studs. Understanding how each quadrant plays, where the terrain transitions happen, and how to exploit the fog cycles is the foundation of every successful escape on this map.
1 - Western Tombstone Fields
The western section contains the densest concentration of tombstones on the map, creating a labyrinth of waist-high cover that enables extended stealth sequences:
- •Tombstone Row Layout: Six parallel rows of headstones run north-to-south with 5-stud gaps between rows. Each row contains 6-8 tombstones of varying heights (some reaching chest height, others only knee height). Survivors crouching between rows are effectively invisible to killers standing on the opposite side unless the killer is within 8 studs.
- •Weeping Angel Statue: A large angel statue marks the center of the western field. This statue provides full standing cover from any single direction and serves as a landmark for orientation during fog cycles when visibility drops. A generator spawns at the base of this statue 50% of the time.
- •Open Grave Pit: A dug-out grave in the southwest corner creates a terrain dip where crouching survivors sit below the ground plane and become invisible from any distance beyond 6 studs. This is one of the strongest hiding spots on the map but has no escape route if the killer checks it directly.
- •Western Perimeter Fence: An iron fence runs along the western map edge with intermittent gaps. The fence itself provides limited cover but the tall hedge row growing along its interior side creates an opaque corridor useful for north-south movement without exposure.
- •Fog Interaction: The western field experiences the densest fog effects on the map due to lower terrain elevation. During thick fog cycles, visibility in this area drops to approximately 8 studs, making it possible for survivors to repair generators completely undetected even on failed skill checks if the killer is beyond the fog threshold.
2 - Eastern Mausoleum District
The eastern section features large stone mausoleum structures that serve as the map's primary hard cover and looping resources:
- •Grand Mausoleum: The largest structure on the map, this two-room mausoleum has a main chamber with a sarcophagus that blocks line of sight and a rear storage room with a locker. The mausoleum has two entrances (north and south) creating a basic loop, plus a window vault on the eastern wall. A generator is guaranteed to spawn inside the main chamber, making this the most contested point on the map.
- •Twin Crypts: Two smaller crypt buildings sit northeast, each with a single entrance and interior hiding space behind stone coffins. These crypts are dead-end structures, meaning entering one commits you to hiding. Killers who check crypts spend 3-4 seconds each, and experienced survivors track whether a killer checks crypts early in the match to gauge how thoroughly they search later.
- •Ossuary Entrance: A partially underground bone storage vault accessible via stone stairs provides a unique below-grade hiding position. The ossuary is a single room measuring 8x6 studs with bone pile props that partially obscure crouching survivors. The entrance stairs create a natural sound cue when the killer descends, giving survivors 2-3 seconds of warning.
- •Eastern Treeline: A row of dead, leafless trees along the eastern boundary provides minimal visual obstruction but creates scratch mark confusion when survivors weave between trunks. The thin trunks do not block line of sight reliably but do break aim for ranged killer abilities.
- •Basement Spawn: The basement entrance spawns beneath the grand mausoleum 65% of the time, making basement rescues on this map relatively safe due to the mausoleum providing multiple exit routes and cover positions for the rescuer.
3 - Northern Chapel Ruins
The northern section features the remains of a collapsed chapel, creating the most structurally complex area of the map:
- •Ruined Chapel Structure: The chapel's walls stand at varying heights, with the northern wall fully intact (providing complete cover) while the southern wall has collapsed to waist height (providing crouch-only cover). The chapel interior contains a broken altar, scattered pews, and rubble that create multiple small cover positions within a confined space.
- •Bell Tower Base: The chapel's bell tower remains standing as the tallest structure on the map. While survivors cannot climb it, the tower base is a 6x6 stud opaque structure with a single entrance that serves as a strong hiding spot. The bell occasionally rings as an ambient sound effect that can mask generator repair sounds for nearby survivors.
- •Graveyard Path: A cobblestone path connects the chapel to the central crossroads, lined with candelabras that emit dim light. This path is the most direct north-south route but also the most exposed corridor in the northern section.
- •Collapsed Roof Debris: Sections of the chapel roof have fallen to create ramp-like terrain features. One debris pile near the east wall creates an elevated position where survivors can see over nearby tombstones. While this vantage point provides information, it also makes the survivor visible from 20+ studs, creating a risk-reward tradeoff.
- •Northern Fog Bank: A permanent thick fog bank sits in the extreme northern corners of the map, reducing visibility to 6-8 studs at all times regardless of fog cycle. Survivors who flee to these corners during chase can reliably lose killers who lack tracking abilities, but generators rarely spawn this far north.
- •Cover spot and Loop Resources: The chapel ruins contain 2-3 cover spot spawns within the structure itself, creating the most loop-friendly area on a map that generally discourages looping. Experienced survivors lead chases toward the chapel ruins specifically to access these cover spots before transitioning to stealth in the northern fog banks.
4 - Southern Gate Garden
The southern section combines decorative garden elements with the map's escape window positions:
- •Memorial Garden: A landscaped area with rose bushes, ornamental trees, and stone benches surrounding a central fountain. The vegetation provides medium-density cover that is less reliable than tombstones but covers a wider area. Crouching behind rose bushes reduces detection probability by approximately 40% at distances beyond 12 studs.
- •Caretaker's Shed: A small opaque structure on the south-central edge containing gardening tools as props. The shed has one entrance and one window vault, creating a basic loop. A generator spawns near or inside the shed 45% of the time.
- •Escape window Positions: Both escape window spawn along the southern map edge, one at the southwest corner near the tombstone fields and one at the southeast near the treeline. The relatively close proximity of both gates (compared to other maps where gates are on opposite edges) means killers can patrol between gates more efficiently during endgame, but survivors can also coordinate gate openings more easily.
- •Southern Wall: A tall stone wall runs across the entire southern boundary with ivy growth that serves purely as visual decoration. The wall creates a dead-end boundary that killers can use to corner survivors who flee south without an escape plan.
- •Flower Bed Hiding: Large flower bed arrangements in the memorial garden create surprisingly effective hiding spots when survivors crouch within them. The colorful flowers partially break up the survivor silhouette, and most killers scan for movement rather than carefully inspecting each flower bed.
- •Gate Approach Corridors: Both escape window have approach corridors flanked by hedges that provide cover during the gate opening sequence. The southwest gate corridor is 12 studs long with hedges on both sides, while the southeast corridor is only 8 studs with hedges on one side, making the southwest gate slightly safer to open under pressure.
5 - Central SFOTH
The center of the map features a crossroads intersection that connects all four quadrants:
- •SFOTH Monument: A large stone obelisk marks the exact center of the map, providing 360-degree cover for crouching survivors. This landmark is visible from 25+ studs in any direction and serves as the primary orientation reference for navigating during fog cycles.
- •Directional Paths: Four cobblestone paths radiate from the crossroads toward each quadrant. These paths are the fastest transit routes but also the most exposed, with minimal cover along their 15-20 stud lengths between the crossroads and each quadrant's terrain features.
- •SFOTH Generator: A generator spawns directly at the crossroads 35% of the time. This is the most dangerous generator on the map due to its exposed central position with sightlines from all four quadrants.
- •Transition Zone Strategy: The crossroads serves primarily as a transit hub rather than a destination. Experienced survivors spend minimal time at the crossroads, using it only as a waypoint when rotating between quadrants. Lingering at the crossroads exposes you to detection from any direction.
Pro Tip
On Yorick's Resting Place, stealth is your primary survival tool, not looping. Prioritize learning every hiding spot and fog timing over mastering cover spot positions. Survivors who crouch-walk between tombstone rows and use fog cycles to move between generators average 15-20% higher escape rates than those who run everywhere. For a comparison of survivor abilities that complement stealth play, check our survivor guides at /forsaken-survivors.
Generator Strategy: Prioritization and Safe Repair Routes
Generator strategy on Yorick's Resting Place differs significantly from most maps because the fog and cover mechanics allow survivors to repair generators that would be suicidal on open maps, while the lack of strong loops makes certain positions unexpectedly dangerous. The key principle is to complete exposed generators early while fog cycles provide cover, then save covered generators in the mausoleum district and chapel ruins for late game when killer pressure intensifies.
Optimal Generator Completion Order
Follow this priority system when choosing which generators to repair first:
- •Priority 1 - SFOTH Generator (if spawned): Complete this first because its central, exposed position becomes increasingly dangerous as generators are completed and the killer narrows their patrol routes. Early game, the killer is searching the full map and is least likely to pass through the crossroads repeatedly.
- •Priority 2 - Western Field Generators: The dense fog and tombstone cover make western generators relatively safe to repair even mid-match, but completing them early ensures you do not need to spend time in the most fog-dependent area during endgame when fog cycles may not align with your needs.
- •Priority 3 - Caretaker's Shed Generator: This southern generator has loop resources (shed structure with window vault) that make it viable as a mid-game repair target with reasonable chase potential if interrupted.
- •Priority 4 - Twin Crypt Generator: Save this for mid-to-late game. The eastern district has the strongest structures for escaping chase after generator completion, making it ideal when killer pressure peaks.
- •Priority 5 - Grand Mausoleum Generator: This guaranteed spawn should ideally be your last generator. The mausoleum provides the best chase resources on the map, and completing it last means you have strong structures available for the intense pressure of final generator completion.
- •Avoid Splitting Generators Across Quadrants: Unlike open maps where spreading generators forces the killer to patrol a wide area, Yorick's Resting Place rewards clustering completed generators by quadrant. Completing all western generators first means the killer gradually abandons that quadrant, creating a safe zone for healing, regrouping, and planning your approach to remaining generators.
Repair Positioning and Fog Exploitation
How you position yourself during generator repair significantly affects your survival odds on this map:
- •Fog Cycle Timing: Thick fog cycles last approximately 20 seconds and occur every 60-80 seconds. Track these cycles mentally and initiate repair on exposed generators at the start of a thick fog phase. If a fog cycle ends mid-repair, consider leaving the generator temporarily if the killer is likely patrolling nearby.
- •Tombstone-Adjacent Repair: When repairing generators in the western field, position yourself on the side closest to a tombstone row so you can immediately drop into cover if the killer approaches. The 1-2 seconds saved by not needing to reach cover from the generator can mean the difference between being spotted and disappearing.
- •Listen Before Repairing: Spend 3-5 seconds listening for killer footsteps, heartbeat audio cues, and ambient sounds before committing to a generator. Yorick's fog can hide the killer as effectively as it hides you, and starting a repair without awareness of the killer's proximity is a common cause of death on this map.
- •Skill Check Sound Management: Failed skill checks create sound notifications that carry through fog. If you fail a skill check on a fog-concealed generator, immediately abandon the generator and reposition 10-15 studs away. The killer will investigate the generator location, not your new position.
Do Not Rely on Looping at Yorick's Resting Place
Yorick's Resting Place has the lowest cover spot density of any medium-large map in Forsaken, with only 8-10 spawns across the entire map compared to 14-16 on comparably sized maps. Attempting to loop killers around tombstones will fail because the gaps between headstones are wide enough for killers to lunge through, and the waist-high cover that conceals crouching survivors provides zero chase protection when you are standing and running. If you enter a chase on Yorick's, your goal should always be reaching a structure (mausoleum, chapel, shed) rather than looping in the open. Check out our tier list at /forsaken-tier-list to see which killers are strongest and weakest on low-cover spot maps like this one.
Tombstone Loop Patterns and Stealth Chains
While Yorick's Resting Place is not a looping map in the traditional sense, the tombstone rows create unique micro-loop and stealth chain patterns that survivors can use to extend chases long enough to reach safe structures. Understanding these patterns transforms tombstones from passive cover into active survival tools that buy critical seconds during pursuit.
Tombstone Row Weaving
Use tombstone rows to create confusion and buy time during chases:
- •Figure-Eight Weave: When a killer chases you through the western tombstone field, weave between two adjacent rows in a figure-eight pattern. Each row transition forces the killer to readjust their pathing, adding 1-2 seconds per weave. Three complete figure-eights buy approximately 6-8 seconds, enough to reach the iron fence perimeter or the central crossroads.
- •Scratch Mark Splitting: When running through tombstone rows, intentionally create scratch marks heading in one direction, then crouch and reverse direction. The fog reduces the distance at which killers can see scratch marks from 10 studs to approximately 6 studs, making scratch mark misdirection significantly more effective than on clear maps.
- •Tombstone Height Exploitation: Taller tombstones (chest height) block line of sight while standing, while shorter ones (knee height) only block while crouching. During a chase, duck behind a tall tombstone to break line of sight, then immediately crouch-walk behind short tombstones in the perpendicular row. The killer will check behind the tall tombstone first, giving you 3-4 seconds of undetected movement.
- •Row End Commitment: Each tombstone row has an open end that exposes you to the adjacent corridor. When approaching row ends during a chase, commit fully to transitioning into the next row rather than hesitating at the gap. Hesitation at row ends is the number one way killers reacquire line of sight on Yorick's.
Crypt and Mausoleum Stealth Techniques
The stone structures in the eastern district require different stealth approaches than the open tombstone fields:
- •Mausoleum Sarcophagus Hide: Inside the grand mausoleum, position yourself behind the sarcophagus on the side opposite the entrance the killer is most likely to use. The sarcophagus is large enough to completely conceal a crouching survivor, and killers who enter from the north door cannot see behind it without walking around the entire structure.
- •Twin Crypt Gambit: Enter one of the twin crypts and hide behind the stone coffin inside. Because crypts are dead-end structures, many killers skip checking them during patrol to save time. Track how often the killer checks crypts early in the match. If they check both crypts in their first two patrols, stop using them. If they skip crypts, they become reliable hiding spots for the entire match.
- •Ossuary Ambush Position: The underground ossuary provides a high-risk, high-reward hiding spot. Position yourself behind the bone pile furthest from the entrance. Killers who descend the stairs commit to checking the ossuary and must turn around to leave, giving you a window to sprint past them and up the stairs while they are deep in the room.
- •Structure Sound Discipline: Inside stone structures, all footstep sounds are amplified due to the hard surfaces. Always crouch-walk inside mausoleums and crypts. Running inside a stone structure creates footstep sounds audible from 12+ studs outside, instantly revealing your position to any nearby killer.
- •Exit Timing: When leaving a hiding spot inside a structure, wait until the killer's heartbeat audio has fully faded before moving. On Yorick's, the heartbeat range of most killers is 24-32 studs. When you can no longer hear the heartbeat, the killer is far enough away for you to safely exit and reposition.
Killer Matchup Analysis on Yorick's Resting Place
Yorick's Resting Place dramatically reshuffles killer effectiveness compared to open maps. The fog, cover density, and low cover spot count create matchups where normally weak killers thrive and normally dominant killers struggle. Understanding how each killer category interacts with Yorick's terrain lets you adapt your strategy before the match begins. For detailed stats on all killers, visit /forsaken-killers.
Killers Who Dominate Yorick's Resting Place
These killers gain significant power from the graveyard environment:
- •Stealth Killers (Noli, similar types): Stealth killers excel on Yorick's because the fog already reduces detection range, and their stealth abilities compound this effect to create near-zero warning time for survivors. On open maps, survivors detect stealth killers at 12-15 studs; on Yorick's during fog cycles, detection drops to 4-6 studs, barely enough time to reach cover. Against stealth killers on Yorick's, pre-position near structures with escape routes rather than repairing exposed generators.
- •Tracking Killers: Killers with aura reading or scratch mark tracking abilities bypass the fog entirely, detecting survivors through terrain and fog that would otherwise conceal them. Tracking abilities are 40-50% more valuable on Yorick's than on open maps because they counter the map's primary survivor advantage. Run abilities that counter tracking if you suspect a tracking killer.
- •Trap Killers: The dense tombstone rows and limited pathways between structures create natural choke points for trap placement. Trap killers can control an entire quadrant by placing traps at the 2-3 entry points to that section, and the fog makes traps extremely difficult to spot. Always check the ground carefully when transitioning between quadrants.
Killers Who Struggle on Yorick's Resting Place
These killers lose significant power on the graveyard map:
- •Ranged Killers: Killers who rely on ranged attacks or long-distance abilities are severely limited by fog reducing sightlines to 10-15 studs during normal conditions and 6-8 studs during thick fog. Ranged killers effectively become basic melee killers on Yorick's, losing their primary advantage.
- •Chainsaw and Charge Killers: The dense tombstone layout prevents long straight-line charges. Tombstone rows interrupt charge paths every 5-6 studs, and the narrow gaps between headstones make precise charge navigation extremely difficult. These killers must rely on basic attacks, reducing their effectiveness by 30-40%.
- •High-Speed Killers: While speed is always valuable, Yorick's minimizes its impact because chases on this map are won through stealth breaks rather than sustained running. A killer with 20% bonus speed still cannot catch a survivor who crouches behind a tombstone and disappears into the fog.
- •Area-of-Effect Killers: AOE abilities that work well in confined spaces (like buildings) are less effective in the open tombstone fields where survivors can move in any direction. The chapel ruins are the only area where AOE killers maintain their standard effectiveness.
Yorick's Resting Place Area Comparison
| Area | Cover Type | Cover spots | Generator Spawns | Fog Density | Safety Rating |
|---|---|---|---|---|---|
| Western Tombstone Fields | Dense Low Cover | 2 | 1-2 (50% each) | Very High | 7/10 |
| Eastern Mausoleum District | Hard Structures | 2-3 | 2-3 (guaranteed mausoleum) | Medium | 8/10 |
| Northern Chapel Ruins | Mixed Ruins | 2-3 | 1 (40%) | High (permanent bank) | 7/10 |
| Southern Gate Garden | Medium Vegetation | 1-2 | 1 (45%) | Medium | 5/10 |
| Central SFOTH | Single Monument | 0 | 1 (35%) | Medium | 3/10 |
| Open Grave Pit | Below Ground | 0 | 0 | Very High | 9/10 (hiding only) |
| Ossuary | Underground | 0 | 0 | None (indoor) | 6/10 |
Escape Route Planning and Endgame Strategies
Endgame on Yorick's Resting Place plays dramatically differently from other maps because the fog provides natural concealment that reduces the effectiveness of the final minute timer. While most maps create tense, exposed endgame scenarios where killers dominate through map control, Yorick's fog allows survivors to hide effectively during gate opening sequences and coordinate escapes through concealment rather than speed.
Escape window Strategy
Maximize your endgame escape chances with these gate-specific strategies:
- •Southwest Gate Approach: This gate sits near the western tombstone field, allowing survivors to approach through dense cover. Use the tombstone rows for concealment during the approach, and have a teammate crouch 10 studs away as a lookout. If the killer approaches, the gate opener can drop into the nearest tombstone row while the lookout draws attention elsewhere.
- •Southeast Gate Approach: This gate has less natural cover but benefits from proximity to the mausoleum district. Survivors approaching from the east can use the treeline and crypt structures to conceal their movement toward the gate.
- •Fog Cycle Gate Opening: If possible, time your gate opening to coincide with a thick fog cycle. The 20-second fog window is enough to complete approximately 60-70% of the gate opening sequence, and the reduced visibility during fog makes it nearly impossible for killers to spot the gate opener from beyond 8 studs.
- •Split Gate Pressure: Because both gates are on the southern edge, the killer can patrol between them in approximately 8-10 seconds. To counter this, have one survivor begin opening each gate simultaneously. The killer must commit to one gate, allowing the other to open freely. Communicate through movement if you see the killer approaching your gate (stop opening and hide) while the other gate proceeds.
- •Post-Gate Opening Rendezvous: After a gate opens, survivors scattered across the map should converge using the western tombstone field as a concealed transit corridor to the southwest gate, or the eastern treeline to reach the southeast gate. Avoid running directly across the central crossroads during endgame.
Hatch Escape Scenarios
When the situation deteriorates to a hatch scenario on Yorick's Resting Place:
- •Hatch Spawn Locations: The hatch on Yorick's can spawn at the crossroads monument, inside the grand mausoleum, near the caretaker's shed, or at the bell tower base. Memorize these four positions and check them systematically when you are the last survivor.
- •Fog Advantage in Hatch Searches: As the last survivor, fog is your greatest ally. During thick fog cycles, you can sprint between hatch spawn locations with reduced risk of detection. Between fog cycles, crouch-walk and use cover to move between potential hatch positions.
- •Killer Hatch Control: If the killer finds the hatch first and camps it, use fog cycles to approach within 8-10 studs and wait for the killer to break their camp to investigate a sound or movement. On Yorick's, the ambient wind and occasional bell tower sounds create false audio cues that distract camping killers.
- •Alternative Win Condition: If the hatch is closed and you must open a gate as the last survivor, Yorick's fog gives you a better chance than most maps. Choose the gate furthest from the killer's last known position and begin opening during a fog cycle. Many killers struggle to find the last survivor on Yorick's due to the combination of fog and abundant hiding spots.
Advanced Techniques for Yorick's Resting Place
Mastering Yorick's Resting Place at the highest level means developing instincts specific to the graveyard environment that go beyond basic stealth and generator strategy. These advanced techniques exploit the map's unique properties in ways that casual players never discover, creating decisive advantages that compound across an entire match.
Fog Cycle Mastery
Transform fog from a passive environmental feature into an active tool:
- •Internal Fog Timer: After your first 5-10 matches on Yorick's, you should develop a mental timer for fog cycles. The pattern repeats with roughly 60-80 seconds between thick fog phases. Anticipating the next fog cycle allows you to pre-position for risky actions (exposed generator repair, quadrant transitions, revive) right before fog thickens.
- •Fog Sprint Windows: When thick fog arrives, switch from crouch-walking to sprinting for the duration of the fog cycle. This 20-second sprint window covers approximately 40-50 studs of distance at full sprint speed, enough to cross the entire map from one quadrant to the opposite corner. Use fog sprints for major repositioning rather than wasting them on short movements.
- •Fog-Masked Revive: Time revive rescues to coincide with fog cycles when possible. The rescuer approaches during thick fog, performs the revive, and both survivors disperse into fog before it clears. This technique reduces the risk of the killer detecting and intercepting the rescue attempt by approximately 50%.
- •Counter-Fog Awareness: Remember that fog conceals the killer as effectively as it conceals you. During thick fog cycles, maintain heightened audio awareness because the killer can approach within 6 studs before becoming visible. Do not assume fog makes you completely safe. It makes both sides equally hidden.
- •Post-Fog Positioning: When a fog cycle ends, immediately assess your position relative to cover. If you sprinted during the fog phase and are now in an exposed area, crouch behind the nearest tombstone or structure before the killer can scan from elevated or distant positions.
Audio Exploitation
Yorick's unique audio environment provides additional tools for survival:
- •Ambient Sound Masking: The map features wind howling, distant bell tolls, and creaking gate sounds as ambient audio. Perform noisy actions (fast vaulting, cover spot drops, failed skill checks) when ambient sounds are playing to mask the noise. Experienced survivors time their window vaults to coincide with wind gusts.
- •Footstep Surface Awareness: Different surfaces on Yorick's produce different footstep volumes. Grass (tombstone fields, garden) is quietest, cobblestone (paths, crossroads) is moderate, and stone (mausoleum interiors, chapel floor) is loudest. Route your movement through grass surfaces when stealth is critical.
- •Generator Repair Sounds: Generator repair sounds carry further on Yorick's than most maps due to the open terrain and lack of wall dampening in the tombstone areas. When repairing exposed generators, be aware that the repair sound is detectable from 15-18 studs even through fog. Position yourself on the side of the generator furthest from the killer's likely patrol route to use the generator itself as a minimal sound barrier.
- •Heartbeat Range Mapping: Each killer has a specific heartbeat audio range. On your first encounter with the killer, note the distance at which the heartbeat becomes audible. Use this range as your warning threshold for the rest of the match, beginning evasive action the instant the heartbeat reaches moderate intensity.
Ability Optimization for Yorick's Resting Place
The stealth-focused nature of Yorick's Resting Place dramatically changes which abilities are effective. Abilities that enhance concealment and audio management gain enormous value, while chase-oriented abilities that rely on cover spot density or loop structures lose effectiveness. Building your loadout specifically for Yorick's can improve your escape rate by 15-25% compared to running a generic build. For a full overview of survivor options, visit /forsaken-survivors.
Best Abilities for Yorick's Resting Place
Prioritize these abilities when you know you are playing on Yorick's:
- •S-Tier - a stealth ability: Eliminates injured breathing sounds that would otherwise reveal your position behind tombstones and inside structures. On a map where survival depends on staying hidden while injured, a stealth ability is arguably mandatory. Without it, hiding behind a tombstone while injured is essentially useless as the killer can hear your breathing from 8+ studs.
- •S-Tier - Urban Evasion: Fast crouch-walking is the primary movement mode on Yorick's. Urban Evasion doubles your crouching speed, allowing you to move between tombstone rows, transition between quadrants, and approach generators at nearly walking speed while maintaining your reduced visual profile. This single ability transforms Yorick's gameplay more than any other.
- •A-Tier - an awareness ability: Because fog reduces visual detection range, an awareness ability provides critical early warning that compensates for reduced visibility. Knowing the killer is looking in your direction gives you 2-3 seconds to reposition before they reach visual range through fog.
- •A-Tier - Distortion: Counters tracking killers who are already the strongest killer type on Yorick's. Preventing aura reading maintains the fog's concealment advantage that is your primary survival tool on this map.
- •B-Tier - a burst-speed ability: While stealth is primary, a burst-speed ability provides an emergency escape when detected. The 2.5-second sprint creates 10+ studs of distance, enough to reach a tombstone row from an exposed generator or reach a structure from the open crossroads.
- •C-Tier - a burst-escape ability: Less effective than on loop-heavy maps because Yorick's chases are about breaking line of sight, not extending loops. a burst-escape ability provides one extra hit of endurance but does not help with the fundamental problem of limited cover spot resources.
- •Recommended Build: a stealth ability, Urban Evasion, an awareness ability, a burst-speed ability. This build maximizes stealth capability, provides early killer detection through fog, and includes an emergency escape tool for when stealth fails.
Pro Tip
If you are new to Yorick's Resting Place, spend your first 3-5 matches focused entirely on learning the map layout rather than trying to escape. Explore every quadrant, find every hiding spot, memorize generator positions, and track fog cycle timing. Knowledge of this map is worth more than mechanical skill. Once you have the layout memorized, your escape rate will climb significantly without any change to your actual gameplay mechanics.
Team Coordination and Communication Strategies
Yorick's Resting Place creates unique challenges for team coordination because the fog that conceals survivors from killers also conceals survivors from each other. Without voice communication, teams must develop visual and behavioral systems that allow coordination despite limited visibility. Even solo queue players can improve team performance by adopting predictable patterns that competent teammates recognize.
Silent Communication Methods
Coordinate with your team using these non-verbal methods:
- •Generator Completion Signals: When you complete a generator, crouch-walk toward the nearest incomplete generator rather than sprinting away. Teammates who see you (during clear fog periods) will understand you are heading to the next objective and can coordinate their own rotation accordingly.
- •Quadrant Responsibility: In the early game, observe where teammates go during the first 30 seconds and claim the unoccupied quadrant. On Yorick's, each quadrant has enough resources for one survivor. Overlapping in the same quadrant wastes resources and increases detection risk.
- •Revive Approach Indicators: When approaching for an revive, crouch near the downed survivor for 2-3 seconds before performing the rescue if the killer is not camping. This brief pause signals to nearby teammates that the rescue is handled, allowing them to continue their objectives.
- •Chase Direction Communication: When in chase, try to run toward unoccupied quadrants to draw the killer away from teammates on generators. If you know teammates are in the western field, lead the killer toward the eastern district or northern ruins.
- •Post-Fog Regrouping: After each thick fog cycle, take a moment to look for teammate positions before resuming activities. The brief clear period between fog cycles is the best time to assess teammate distribution and adjust your own position accordingly.
Yorick's Resting Place Ability Value Comparison
| Ability | Standard Map Value | Yorick's Value | Reason |
|---|---|---|---|
| a stealth ability | A-Tier | S-Tier | Hiding while injured is core strategy |
| Urban Evasion | B-Tier | S-Tier | Crouch movement is primary travel mode |
| an awareness ability | B-Tier | A-Tier | Fog reduces visual detection range |
| a burst-speed ability | A-Tier | B-Tier | Stealth breaks > distance creation |
| a burst-escape ability | S-Tier | C-Tier | Few loops to extend with extra hit |
| a map-awareness ability | A-Tier | D-Tier | Minimal cover spot and window resources |
| Bond | B-Tier | A-Tier | Fog limits teammate visibility |
| Prove Thyself | B-Tier | A-Tier | Duo repairs reduce exposure time |
Final Thoughts
Yorick's Resting Place stands apart from every other map in Forsaken by rewarding a completely different skill set than what most players develop through their normal gameplay. While other maps test your looping ability, cover spot timing, and chase mechanics, Yorick's tests your patience, your awareness, your knowledge of the terrain, and your ability to disappear when the killer comes calling. The graveyard is not a map where the best runners survive. It is a map where the best hiders survive, where fog is your greatest ally, and where a single tombstone can mean the difference between escape and elimination. Develop your fog cycle intuition, memorize every hiding spot across all four quadrants, and build your loadout around stealth rather than chase. The survivors who consistently escape Yorick's Resting Place are not mechanically superior to those who die there. They simply understand that this map plays by its own rules, and they respect those rules rather than fighting against them. Invest 10-15 matches into pure map knowledge acquisition before worrying about escape rates, and you will find that Yorick's transforms from one of the most stressful maps in Forsaken to one of the most reliable for consistent escapes.
- • Yorick's Resting Place is a stealth-first map with only 8-10 cover spots, so hiding and fog exploitation are your primary survival tools rather than traditional looping
- • Fog cycles last 20 seconds and repeat every 60-80 seconds. Time risky actions (generator repairs, quadrant transitions, revive) to coincide with thick fog phases
- • Complete exposed generators (crossroads, western field) early and save covered generators (mausoleum, chapel) for late game when killer pressure intensifies
- • a stealth ability and Urban Evasion are S-tier abilities on this map because they enhance your ability to hide while injured and move while crouching, the two most important actions on Yorick's
- • Stealth and tracking killers dominate this map while ranged and charge killers lose 30-40% effectiveness due to fog and tombstone density
- • Both escape window spawn on the southern edge, so coordinate split gate pressure and use fog cycles to conceal gate opening sequences
- • Master the audio environment: use ambient sounds to mask noisy actions, route through grass surfaces for quieter footsteps, and track killer heartbeat ranges for precise threat assessment
Queue into Yorick's Resting Place with a stealth ability and Urban Evasion equipped, and spend your first three matches purely exploring the map without focusing on escape. Learn every tombstone row, find every hiding spot, and time the fog cycles. On your fourth match, apply everything you learned and watch how naturally the escapes come when you truly understand the graveyard.
Related Forsaken Guides
How to Unlock John Doe in Forsaken: Step-by-Step Secret Character Guide
Unlock the secret John Doe character in Forsaken. Complete guide with all requirements, quest steps, and tips to get this exclusive killer fast.
Medkit Guide Forsaken: Healing Strategies That Save Matches
Complete medkit guide for Forsaken. Learn efficient healing, medkit conservation, and clutch healing strategies that turn losses into wins.
Forsaken Map Layouts Guide: Understanding Every Structure
Learn every map layout in Forsaken with detailed structure breakdowns, tile spawn patterns, and strategic positioning for optimal gameplay.
Nosferatu Forsaken Guide 2026: 4 Abilities, Bloodhook Combos, Counter
Nosferatu in Forsaken 2026: Bloodhook + Cataclysm + Hunter's Feast + Ascension explained, the M1-cooldown combo, and the best survivor counter ranked.
Best Support Survivors in Forsaken: Elliot vs Shedletsky vs Chance vs Two Time
Support meta guide for Forsaken. Learn how to play Elliot, Shedletsky, Chance, Two Time, plus when to pick 007n7 and Noob for intel and clutch saves.
Back to the ForsakenHub homepage for the full Forsaken Roblox guide hub, or browse all guides. You can also play the game directly on Forsaken on Roblox.