Nosferatu Forsaken Guide 2026: 4 Abilities, Bloodhook Combos, Counter
Nosferatu in Forsaken 2026: Bloodhook + Cataclysm + Hunter's Feast + Ascension explained, the M1-cooldown combo, and the best survivor counter ranked.
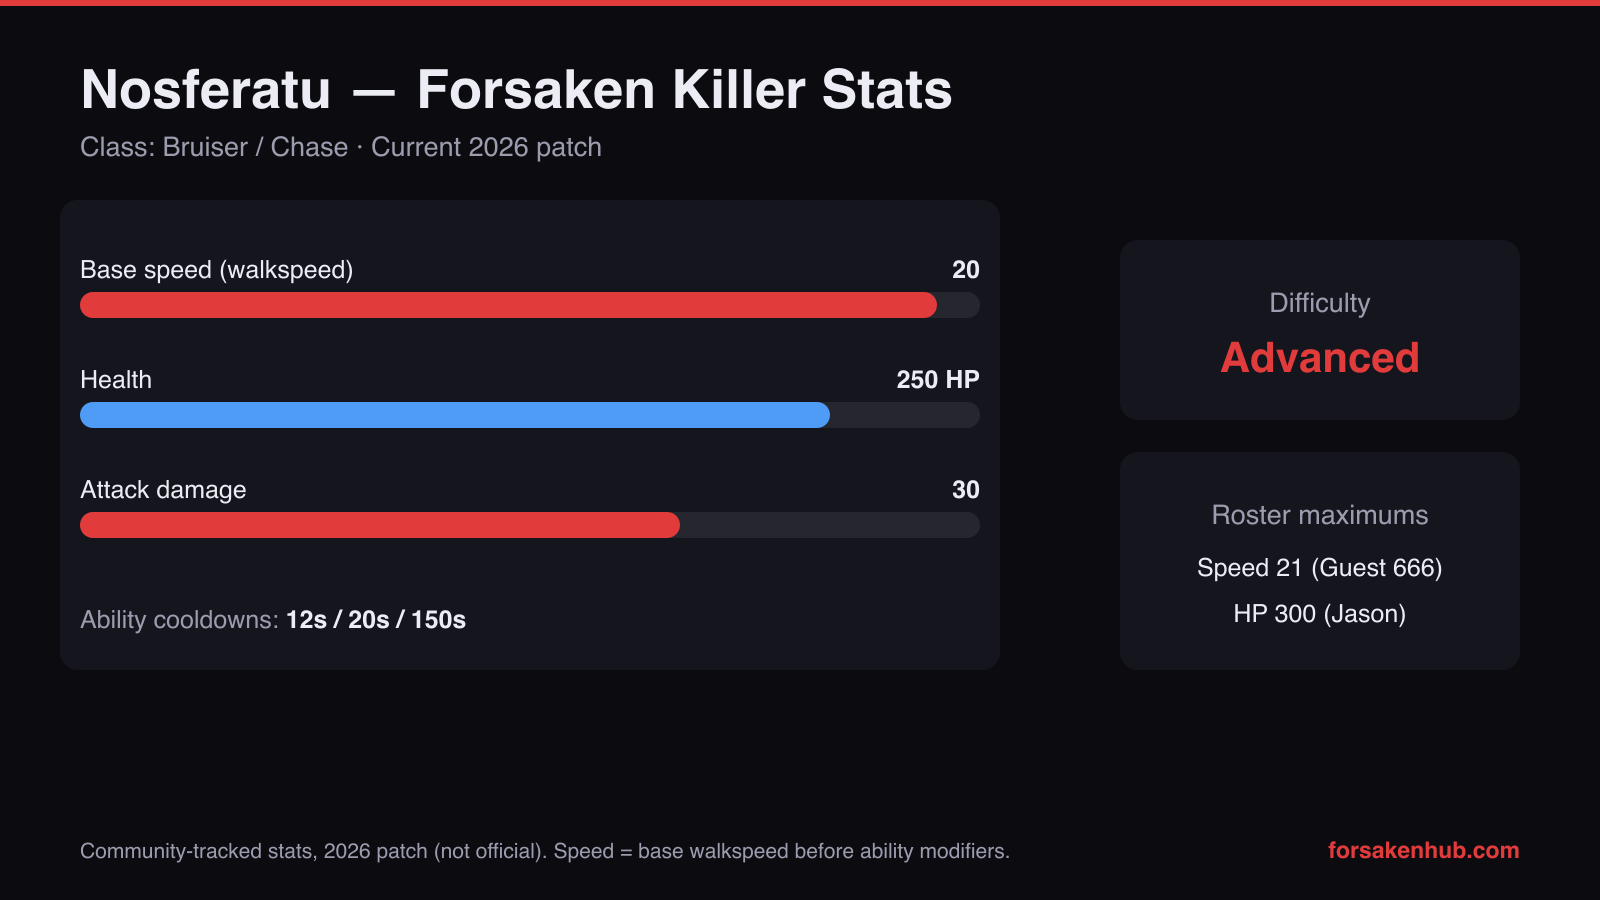
Nosferatu's stats from the Official Forsaken Wiki (September 2026). Chart by ForsakenHub.
Nosferatu is Forsaken’s most expensive killer (1,922 Player Points) and one of the most dangerous when you chain his mobility tools correctly. Nosferatu is not a “one gimmick” killer. He has stealth (silent footsteps), burst mobility (Cataclysm dash), ranged disruption (Hunter’s Feast orb), a long-range catch tool (Bloodhook), and a vertical threat (Ascension flight). That kit means survivors can’t counter you with one habit like “just hug corners” or “just hold W”. This guide breaks down every ability with the important numbers, shows practical combo routes you can repeat in real matches, and gives you the clearest counterplay expectations so you know what good survivors will try to do.
Quick Stats: Nosferatu
- • Unlock Cost: 1,922 Player Points
- • Passive: Levitation removes footstep sounds
- • Bloodhook Range: ~115 studs
- • Blood Hook Cooldown: 24 s (15 damage on hit, then drags the survivor toward you)
- • Cataclysm: 22 s cooldown; the blood trail inflicts Bleeding II and Slowness I and reveals survivors
Watch one full match, then return to the tables and combo routes below to practice on purpose.
Nosferatu Ability Table (Numbers + Best Use)
This is the fastest way to remember Nosferatu: what each button is for, and what survivors will try to do against it.
| Ability | Cooldown | What It Does | Best Use | Common Survivor Response |
|---|---|---|---|---|
| Levitation (Passive) | N/A | Removes footstep sounds (silent approach). | Approach corners, doorways, stair tops, and objectives from off-angles to create “no warning” hits. | Survivors start doing more camera checks and hugging hard cover to confirm your position. |
| Lacerate (M1) | 2s | 24 damage, 0.3s windup, 7.5-stud length. | Cash in damage after you force a bad path with Cataclysm or after a Bloodhook pull. | Survivors attempt corner loops and bait swings to waste your tempo. |
| Bloodhook | 20s miss / 30s hit | Long-range chain that can pull and deal up to 35 total damage on success. | Start-of-chase catch tool and mid-lane punish when survivors over-run in the open. | Survivors hide behind micro-cover and hard-turn corners to break your chain line. |
| Cataclysm | 25s | Invisibility dash + 10 damage explosion + puddles that apply Bleeding II and Slowness II. | Break strong loops and zone off mandatory travel lines so survivors must reroute. | Survivors try to rotate away early and avoid re-crossing the same tile twice. |
| Hunter's Feast | 20s | Orb that deals 5 damage, applies Oblivious/Creatures for 10s, and grants stealth buffs if it hits. | Force movement and use the stealth window to cut off the next objective instead of immediately swinging. | Survivors break line of sight quickly and bait your one redirect into walls. |
| Ascension | 35s | Temporary flight that changes your approach angle and lets you reposition. | Endgame interception, scouting rotations, and breaking “safe corner” patterns. | Survivors rotate wide and stall until the flight window ends. |
Use this table as your “warm-up sheet” before ranked/public sessions.
Nosferatu’s Abilities (What They Actually Do and When to Use Them)
If you want consistent 3K–4K games, treat Nosferatu like a tempo killer. You are cycling cooldowns to force bad decisions, not hoping for one lucky hit.
1) Levitation + Lacerate (Your Reliable Base Loop)
Your passive and M1 define how your chases feel when you have no cooldowns available.
- •Levitation removes your footstep sounds, so your best “free hits” come from approaching on angles where survivors rely on audio cues, such as corners, stair tops, and doorframes.
- •Lacerate deals 24 damage with a 0.3s windup, 0.3s linger, and 7.5-stud length, which rewards disciplined spacing because you can punish early turns with consistent lunges.
- •Because your base hit is not huge burst damage, your goal is to use cooldowns to create hit windows, then use Lacerate to cash in the damage safely.
- •If a survivor is looping a tight corner, do not over-swing blindly, because Nosferatu is explicitly countered by corner looping when his telegraphed abilities miss.
- •Against good sentinels, assume they are saving stuns for your commit moments, so keep your camera stable and avoid panic swings that waste your stealth advantage.
2) Bloodhook (Your Catch and Start-of-Chase Win Button)
Bloodhook is the ability that turns “safe distance” into “you are suddenly in trouble”. Use it early to decide the chase, not late as a desperation play.
- •Bloodhook has roughly 115 studs of range and can be blocked by the environment, so your best setup is to take a slight off-angle that keeps your chain line clear.
- •If Bloodhook lands from long range, a time-based prompt appears for both players, so your job is to keep pressure by moving forward and forcing the survivor’s input to be stressful.
- •A successful full pull deals 35 total damage (15 initial plus 20 additional), which is enough to flip a chase from “healthy loop” to “one mistake and you die”.
- •If Bloodhook lands at close range, it can drag and deal 18 total without the prompt, which makes it ideal at short corners when survivors attempt tight jukes.
- •Bloodhook cooldown is 20 seconds on miss and 30 seconds on hit, so you should deliberately attempt it near the start of chase to either get a massive advantage or force a long safe window you can play around.
3) Cataclysm (Invisibility Dash + Zone Trap)
Cataclysm is how you turn a strong loop into a bad one by changing the geometry and making the floor unsafe.
- •During the dash you gain Invisibility IV, which means your best use is to force survivors to guess whether you committed left or right at a fork.
- •Cataclysm deals 10 damage on the explosion and drops puddles that apply Bleeding II (12 damage over time) and Slowness II for 4 seconds, so it provides both damage and chase control.
- •Puddles last 12 seconds and highlight survivors for 5 seconds if they step in them, so your follow-up plan should be to herd survivors back through the zone instead of letting them rotate away freely.
- •Because you teleport back to the start point before the stomp/explosion, you should place your start point where you still have line of sight for the re-engage.
- •Cataclysm is strongest on narrow tiles and choke points, because survivors have fewer clean path options and are forced to choose between puddles or direct hits.
4) Hunter’s Feast (Orb Pressure + Stealth Buff Window)
Hunter’s Feast is a tempo tool: it disrupts, forces movement, and rewards you with stealth if you land it.
- •The orb deals 5 damage and applies Oblivious plus Creatures for 10 seconds, which means survivors lose reliable “terror” information and can be forced into bad rotations.
- •The orb can be redirected once by pressing the ability again, so you can fake one lane and then redirect to punish a predictable sidestep.
- •It cannot pass through walls and cannot be redirected more than once, so you should use it in open lanes where survivors need to run forward to progress.
- •If you hit a survivor with Hunter’s Feast, you gain Invisibility and Undetectable for 10 seconds, which is your best window to reposition and create a surprise follow-up swing.
- •Because hitting the same survivor you tagged removes your stealth effects, you should often use the stealth window to approach a different survivor or cut off the exit route first.
- •Survivors will try to break line of sight and hard-turn corners to make redirection fail, so aim it where their next two seconds of movement must be, not where they are right now.
5) Ascension (Vertical Threat and Repositioning)
Ascension is not just “cool flight”. It is a positioning tool that lets you threaten angles survivors don’t practice against.
- •Ascension has a 35-second cooldown, so you should think of it as a “once per major chase” ability rather than something you spam on cooldown.
- •Vertical changes are strongest when survivors rely on one corner turn, because you can change your approach angle and remove their visual information advantage.
- •Use Ascension when you want to scout generator clusters or predict a rotation, because vision and map awareness often produce more kills than raw chase speed.
- •If a survivor is baiting you into a tight corner loop, Ascension can break the pattern by forcing them to choose a new escape line while you reposition.
- •Do not Ascend with no plan to re-engage, because experienced teams will use that window to reset heals and split objectives.
Pro Tip
If you’re learning Nosferatu, play 5 matches where your only goal is to land Bloodhook early in chase. Track how many attempts it takes and what angles made it easiest. That one habit improves faster than trying to master every cooldown at once.
Repeatable Combo Routes (How to Create Downs Without Gambling)
Nosferatu’s kit is strongest when you treat it like a sequence: create a mistake with one ability, then cash it with Lacerate or another cooldown.
1) “Elimination → Herd” (Bloodhook into Cataclysm Zone)
This is your most reliable pattern because it works in both open maps and indoor maps.
- •Start by threatening Bloodhook at medium range, because survivors often juke early and expose their next path line.
- •If Bloodhook lands, commit to closing distance immediately, because the psychological pressure increases prompt mistakes and sets up your next ability.
- •As soon as you are within one tile, use Cataclysm so the puddles cut off the most obvious escape line, forcing the survivor to either take slow or take direct damage.
- •Use Lacerate to punish any panic run out of the puddle zone, because the 0.3s windup is fast enough to catch greedy survivors.
- •If Bloodhook misses, you still gained information about their pathing, so rotate and re-attempt from a new angle rather than repeating the same lane.
- •This route is strongest when you keep the fight in narrow tiles where puddles matter, so steer chases away from wide-open spaces whenever possible.
2) “Orb → Reposition” (Hunter’s Feast into Surprise Hit)
This pattern wins games against survivors who are good at raw looping but bad at information discipline.
- •Throw Hunter’s Feast down a lane where a survivor cannot immediately hard-turn behind a wall, because the orb cannot pass through walls and only redirects once.
- •Redirect once as soon as you see the survivor commit, because late redirects are easier to dodge and reduce your pressure value.
- •After landing the orb, use your 10-second Invisibility/Undetectable window to cut off the next objective rather than swinging instantly.
- •Approach from an off-angle where your silent footsteps matter, because the stealth window plus Levitation can produce a free first hit without a mind game.
- •If you already hit the tagged survivor once, swap targets if the lobby allows it, because spreading damage can collapse a team faster than hard-tunneling one perfect looper.
- •Use this route to protect a 3-gen area, because stealth repositioning is most valuable when survivors must return to predictable objectives.
3) “Anti-Corner” (Cataclysm to Break Tight Loops)
This is your answer to survivors who keep corner-looping to make your telegraphed tools miss.
- •Begin by walking the loop normally and forcing the survivor to commit to their preferred turn direction, because that reveals what space you need to cut off.
- •Activate Cataclysm from a position that still lets you see the survivor’s exit, because the teleport-back mechanic punishes careless start points.
- •Use the Invisibility IV dash to threaten the “wrong side” of the loop, then let the puddles punish the survivor if they attempt to re-enter the tile.
- •Your goal is not to get immediate damage from Cataclysm, but to remove the survivor’s clean corner reset and force them into a wider lane.
- •Once the survivor is in a wider lane, swap to Bloodhook threats, because clear sight lines increase your hit chance.
- •If you lose momentum, do not keep forcing the same corner, because Nosferatu is explicitly weaker there; rotate and force the survivor to play a different tile.
Common Nosferatu Mistakes
The fastest way to “feel weak” on Nosferatu is to spam abilities on cooldown with no plan. If you Cataclysm into a bad start point, throw Hunter’s Feast into walls, and Bloodhook from blocked angles, you will create long downtime windows where survivors safely reset and you lose the tempo advantage that makes Nosferatu scary.
How Survivors Counter Nosferatu (So You Can Counter Their Counter)
Good survivors are not trying to out-run you forever. They are trying to waste your cooldowns, force you into corners, and then reset as a team.
1) The “Corner Loop” Counter and Your Answer
Corners reduce the value of your telegraphed abilities, so survivors will drag you there on purpose.
- •Expect survivors to hug corners so Bloodhook lines are blocked and Hunter’s Feast cannot be redirected effectively, because the wall geometry does the work for them.
- •Your answer is to rotate the chase to a lane where you can see 115 studs of space, because clear lines are where Bloodhook becomes a real threat.
- •If you must fight in a corner, use Cataclysm to change the tile rather than trying to “out-mindgame” every turn, because the puddles create forced decisions.
- •Do not chase a perfect corner looper for 60+ seconds, because Nosferatu wins by tempo, and wasting a minute is exactly what survivors want.
- •Break off and hit a different survivor if you have a stealth window, because spreading damage forces heals and reduces coordinated looping discipline.
2) Support Survivors (Elliot, Shedletsky) and How to Pressure Them
Support picks reduce your snowball unless you identify and punish their positioning.
- •Elliot can heal teammates with Pizza Throw (5 HP instantly and 20 over time), so your goal is to interrupt heal windows and force multiple injured states at once.
- •Elliot’s self-heal limitations mean he often plays safe, so you should pressure objectives he is likely to rotate through rather than chasing his fastest teammate.
- •Shedletsky can stun for 3 seconds with a well-timed Slash, so you should bait the stun, step out of range, and then punish the recovery window.
- •Because Shedletsky slows himself heavily during Slash usage, you can often re-engage his teammates faster than he can reposition after missing.
- •Against coordinated supports, Hunter’s Feast is strong because Oblivious disrupts “heal calls” and makes it harder to coordinate safe resets.
- •If you notice the lobby stacking heals, shift your plan toward objective denial and rotation cuts, because kills become easier when survivors cannot safely regroup.
3) What to Expect From Top Survivors (And How to Win Anyway)
Top survivors will treat your abilities like resources to drain, so your job is to be unpredictable with when you commit.
- •They will intentionally bait Bloodhook and then run during the 30-second cooldown window, so you should either hold your elimination until it is high value or swap targets immediately.
- •They will step around puddles and re-route, so place Cataclysm zones on mandatory travel lines rather than in “nice to have” areas.
- •They will break line of sight on Hunter’s Feast, so you should throw it early in lanes and redirect quickly to punish the first dodge.
- •They will force you into corners and tight loops, so prioritize chase steering: cut off the corner route before you are forced to fight there.
- •They will group when your cooldowns are down, so use your stealth windows to split them rather than trying to brute-force a stacked group.

Nosferatu as they appear in Forsaken. Image: Forsaken (Roblox) © Forsaken Dev Group, via the Official Forsaken Wiki (forsaken.wiki).
Final Thoughts
Nosferatu is strong because he can play multiple “tempo games” at once: stealth approach, long-range catch, zone control, and disruption. The secret to consistency is simple: make your cooldowns create forced decisions, then use Lacerate to secure the damage. When you stop spamming abilities and start sequencing them, Nosferatu becomes one of the most reliable killers for winning public matches and punishing disorganized teams.
- • Levitation removes footsteps, so your best free hits come from surprise angles and corner approaches.
- • Bloodhook is your chase opener; use it early to either win the chase or create a predictable cooldown window.
- • Cataclysm is your loop breaker because puddles create forced path choices for 12 seconds.
- • Hunter’s Feast is a tempo tool that rewards hits with 10 seconds of stealth repositioning.
- • Ascension is a positioning tool; use it with a plan to intercept, not as a panic escape.
- • Your best combo mindset is “force a mistake, then cash it” instead of gambling for one perfect ability.
- • Good survivors counter you by corner looping and draining cooldowns, so steer chases to open lanes and rotate targets when needed.
Next step: play 10 Nosferatu matches and track one stat only—how many Bloodhooks you land before your first down. Then adjust your angles until that number climbs.
Related Forsaken Guides
Forsaken Admin & Dev Killers Guide - Secret Characters Explained (2026)
Everything about Forsaken's admin and dev killers. How to unlock secret characters, their abilities, and what makes them different from regular killers.
Forsaken Mobile Guide 2026 - Touch Controls, Settings & Tips
Complete guide to playing Forsaken on mobile. Touch controls layout, best mobile settings, performance tips, and strategies for phone and tablet players.
How Long Is a Forsaken Match? Player Count, Rules & Game Length (2026)
How long a Forsaken match is and every real rule: a 4-minute clock trimmed 3 s per generator layer and extended per elimination, 1 killer vs 4 survivors, Last Man Standing at 1:14, no hooks or hatch, and what a round pays in Player Points.
Guia Completa de Forsaken Roblox 2026 - Como Jugar, Tips y Estrategias
Guia completa de Forsaken en Roblox en espanol. Aprende a jugar, mejores estrategias para sobrevivir y ganar como killer o survivor en 2026.
Todos los Mapas de Forsaken 2026 - Nombres, Layouts y Estrategias
Lista completa de todos los mapas de Forsaken Roblox en 2026. Nombres, layouts, ubicaciones de generadores y estrategias para cada mapa.
Back to the ForsakenHub homepage for the full Forsaken Roblox guide hub, or browse all guides. You can also play the game directly on Forsaken on Roblox.