1x1x1x1 Forsaken Guide 2026: All 4 Abilities Ranked + Best Counter
1x1x1x1 in Forsaken: all 4 abilities ranked, the exact combo that wins chases, the 1 survivor that hard-counters him, and 2026 patch changes.
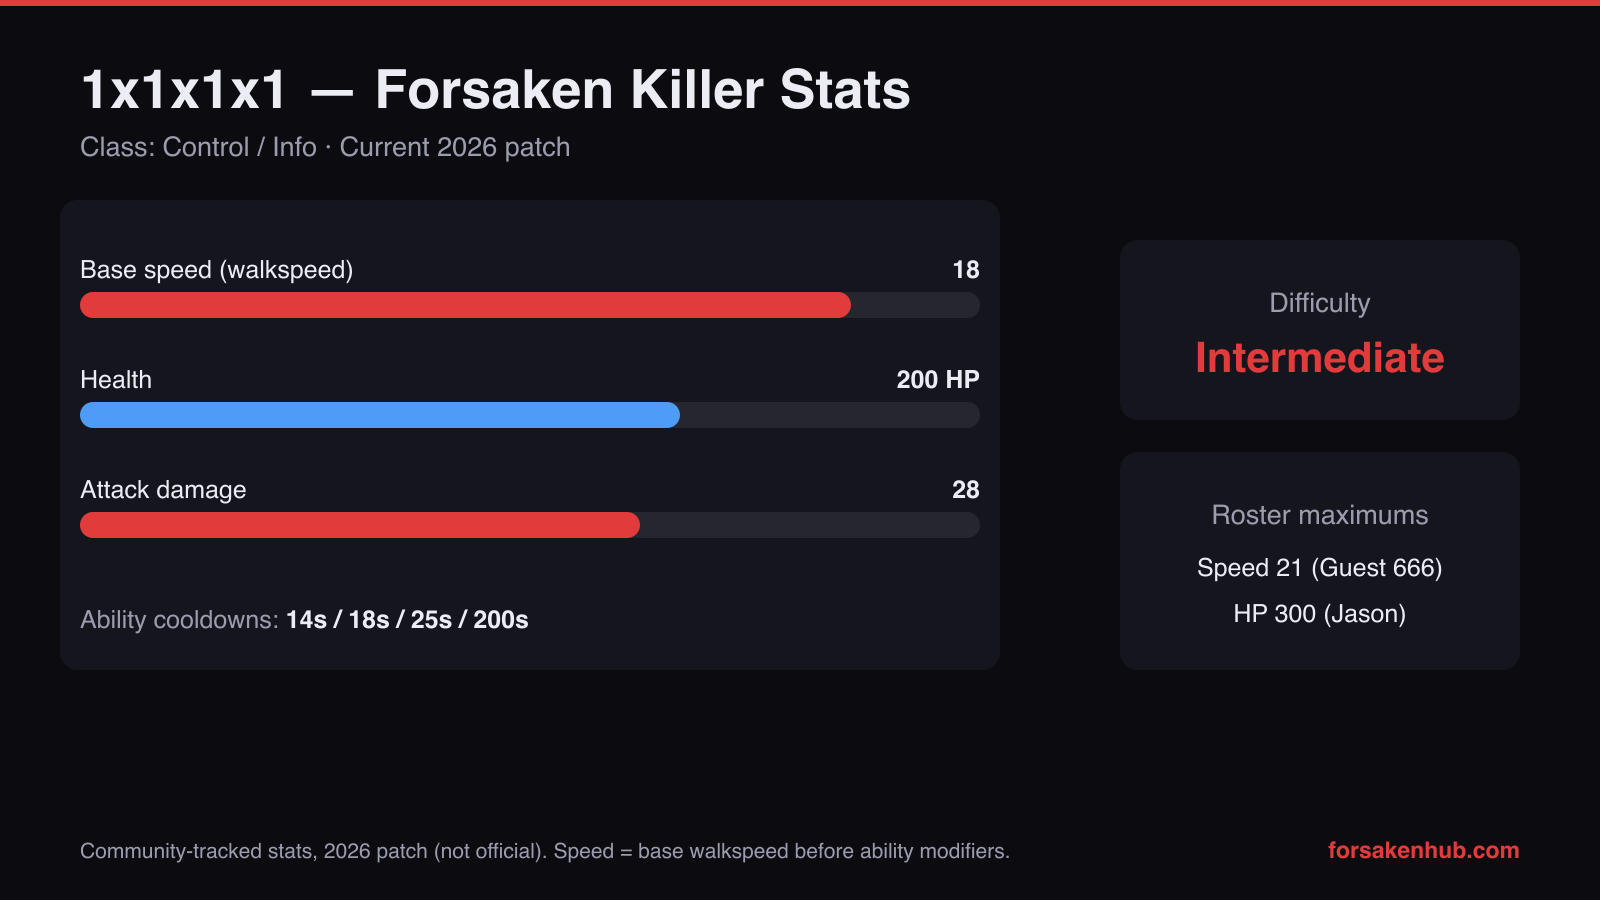
1x1x1x1's stats from the Official Forsaken Wiki (September 2026). Chart by ForsakenHub.
1x1x1x1 is one of Forsaken’s most iconic killers because he rewards planning: you win by stacking information + crowd control, not by “holding W” and hoping for hits. If you’ve ever felt like your chases are fine but your matches still slip away (gens pop, rescues happen for free, and you only get downs when survivors misplay), 1x1x1x1 is the killer that teaches you how to control the whole map. This guide focuses on the parts that actually raise your kill rate: which cooldown to spend first, how to layer Entanglement with your reveal tool, and how to keep pressure when survivors split.
Quick Stats: 1x1x1x1 (Official Forsaken Wiki, September 2026)
- • Unlock Cost: 1,250 Player Points (community listing)
- • Slash: 20 damage, 1.75s cooldown, 7.5-stud length; inflicts Glitched I and Poisoned I
- • Mass Infection: 15s cooldown, 30 damage shockwave; Glitched II and Poisoned V on a projectile hit
- • Entanglement: 15s cooldown, roots for 0.85–1.25s, swords travel 125 studs per second
- • Unstable Eye: 25s cooldown (12.5s at round start), reveals every aura for 8s with Speed II and Blindness III on himself
- • Rejuvenate The Rotten: 30s cooldown, raises killed survivors as 25 HP zombies with a 20-stud aggro range
- • Body: 102,550 HP as listed on the wiki, 8 walk / 27 run speed, 110 stamina, 1,250 Player Points, difficulty 4/5
Watch the first 2–3 chases, then come back and match what you saw to the “Cooldown Layering” section.
1x1x1x1 Ability Cheat Sheet (What To Press, When)
Use this table as your mental model. 1x1x1x1 plays best when you rotate tools: reveal → deny path → cash damage → reset pressure.
| Ability | Cooldown | What It Does | Best Use | Survivor Counterplay |
|---|---|---|---|---|
| Basic Attack (M1) | N/A | Your consistent damage source. | Cash in after you force a bad route with Entanglement, or when Unstable Eye confirms a corner. | Tight corners, hard line-of-sight breaks, and baiting early swings. |
| Mass Infection | 14s | Applies your “pressure” state to accelerate future value (match-wide tempo tool). | Use early and often; it’s strongest when survivors are still grouped near objectives. | Split wide and rotate through cover to avoid follow-up effects. |
| Entanglement | 18s | Stops the “clean” escape route and forces awkward pathing. | Spend it when you can see a committed line (a window or cover lane) so you deny it on reaction. | Pre-rotate away earlier, or force you to place it blind by faking direction changes. |
| Unstable Eye | 25s | Reveals every living player's aura for 8s and shows their health colour; you also take Speed II and Blindness III for the duration. | Confirm which side of a tile to cut, and decide whether to drop chase to protect objectives. | Hold still behind hard cover, change floors, and avoid predictable re-peeks. |
| Rejuvenate the Rotten | 200s | Long-cooldown power spike (momentum tool). | Pop it when the lobby is stabilized (survivors healed/splitting) to re-create chaos. | Slow-play and stall until the window ends; don’t give free snowball downs. |
Numbers change; the important part is the sequence: you’re rotating information + denial, not spamming one button.
How 1x1x1x1 Wins Matches (The “Pressure Loop”)
Most killers have a single win condition (“land the dash”, “hit the projectile”). 1x1x1x1 wins by repeating a pressure loop: get information, deny the best path, force damage, then re-check the map before you over-commit.
1) Information First (So Your Denial Is Accurate)
Your strongest Entanglement is the one you place after you already know where the survivor is going.
- •Treat Unstable Eye as a chase tool, not a “search” tool: pop it once you’re entering a tile so you learn which side the survivor chose.
- •When you see the aura, pick one denial decision: block the route that leads to safety, not the route that looks flashy.
- •If the aura shows the survivor is already leaving the tile, do not stubbornly chase; take the free information and rotate to defend the nearest objective.
- •If you can’t see anyone on reveal, assume the lobby split and you need pressure, not chase: use Mass Infection to set up the next two minutes.
2) Deny One Thing (So You Don’t Over-Spend Cooldowns)
Entanglement is not for “maybe”. Use it to remove a single clean option that survivors rely on.
- •Wait for commitment: when a survivor lines up a window, commits to a doorway lane, or hard-runs to a safe tile, that’s your cue.
- •Aim for forced pathing: your best Entanglement makes their next 2–3 seconds awkward, not their next 0.2 seconds surprising.
- •If you Entangle too early, good survivors simply rotate to the next tile and you traded a cooldown for nothing.
- •If you Entangle too late, you forced yourself to play a “fair” loop where 1x1x1x1 is average.
- •After Entanglement forces a turn, take the guaranteed hit instead of trying to mindgame for style points.
3) Cash Damage, Then Reset Pressure (Don’t Tunnel Your Tempo Away)
1x1x1x1 is terrifying when survivors feel like you are everywhere. You keep that feeling by leaving chases at the right time.
- •If you have a down but two gens are about to pop, consider a short rotation before committing to a long carry/animation cycle.
- •When you get a elimination, look for the next pressure play immediately: you want Mass Infection/Unstable Eye value before survivors fully reset.
- •Avoid “one survivor syndrome”: if one survivor is a great looper, you can still win by farming everyone else with better map decisions.
- •Use your long cooldown (Rejuvenate the Rotten) as a match reset when the lobby stabilized; don’t waste it during a chase you already control.
Repeatable Combo Routes (3 Patterns You Can Practice)
These are “training wheel” sequences you can deliberately repeat until they become automatic. The goal is consistency, not highlight clips.
Combo A: Reveal → Deny → Hit (The Safe Chase Starter)
Use this when you make first contact and you don’t want to guess where the survivor will go.
- •Trigger Unstable Eye as you enter the tile so you see which side they are rotating.
- •Place Entanglement to remove the clean exit (the window route or the long lane), not the “closest” spot.
- •Walk them into the awkward path, then take the M1 when they commit to a turn.
- •If you miss the hit, do not panic-spend Mass Infection immediately; keep one cooldown to correct your next decision.
Combo B: Infection Early → Rotation Midgame (The Snowball Plan)
Use this when the lobby is coordinated and you need match-wide tempo, not a single down.
- •Use Mass Infection as soon as you identify the “busy” side of the map (multiple objectives or multiple survivor sightings).
- •Take one short chase to force healing resources, then immediately rotate using information from Unstable Eye or survivor noise/visuals.
- •Re-enter another survivor’s area with Entanglement ready so you can force a fast hit without a long loop.
- •Repeat this twice: 1x1x1x1 is strongest when you create three injured states before survivors can reset.
- •Only hard-commit to a down when you know two other survivors are not on objectives.
Combo C: Rejuvenate → Collapse (The “End the Match” Window)
Use this when survivors have stabilized and the match is slipping into “safe rotations”.
- •Pop Rejuvenate the Rotten when survivors are healed or splitting, because that’s when momentum swings matter most.
- •Force one quick hit with Entanglement (avoid long loops), then immediately pressure the rescue side so survivors feel unsafe to commit.
- •Use Unstable Eye to confirm whether the lobby is grouping for a save; if they are, deny the path that lets them chain-save.
- •Don’t tunnel: the goal is to break the lobby’s rhythm and create multiple mistakes inside one minute.
- •When the window ends, go back to the pressure loop: info → deny → cash → reset.
Common 1x1x1x1 Mistakes That Lose Games
The fastest way to tank your win rate is to spend Entanglement blind, chase one survivor for 60+ seconds, and forget to use Unstable Eye for decision-making. Play 1x1x1x1 like a control killer: your job is to make the map smaller, not to prove you can mindgame one corner.
Survivor Counterplay (So You Can Predict It)
Good survivors do not “fight your kit”. They change their habits so your kit has less value. If you know their plan, you stop wasting cooldowns.
What Survivors Will Try
These are the most common adaptations once survivors realize you’re playing 1x1x1x1 correctly.
- •Hard line-of-sight breaks to reduce Unstable Eye value (multi-room turns, stair transitions, tight corners).
- •Earlier rotations to avoid being “committed” when Entanglement comes out.
- •Wide splits so Mass Infection pressure doesn’t convert into chained downs.
- •Baiting you into over-rotating: one survivor gets chased while two silently finish objectives elsewhere.
How You Answer
Your counterplay is mostly discipline: don’t let them decide what kind of match it is.
- •If they split wide, you split your attention: take shorter chases and farm damage states instead of one dramatic tunnel.
- •If they hide hard from Unstable Eye, treat the “no auras” result as information and go defend objectives immediately.
- •If they pre-rotate, hold Entanglement until they are truly committed to a lane; make them prove where they’re going.
- •If they stall your big window, switch from “chase” to “deny”: interrupt rescues, push people off objectives, and keep them moving.
- •Keep your decisions simple: reveal to confirm, deny one route, take the hit, rotate.
Practice Plan (30 Minutes That Improves You Fast)
If you want real improvement (not just “played 20 matches”), do a short focused plan.
Three Focus Matches
Each match has one goal. Track it after the match in one sentence.
- •Match 1: Use Unstable Eye only during chase entry (not while searching). Count how many times the reveal directly changed your path choice.
- •Match 2: Use Entanglement only after you see a committed lane/window. Count “wasted” Entanglements (no value within 5 seconds).
- •Match 3: Rotate after first hit at least twice (don’t tunnel). Count how often that rotation found an objective side with survivors.
One Review Question
After those matches, answer one question honestly:
- •Did you lose because you missed hits, or because you chose the wrong chase/rotation? If it’s mostly rotations, your next goal is map discipline, not mechanics.
Sources (So You Can Verify Numbers)
Forsaken changes quickly. For exact live values, always verify in-game. These links are useful reference points for the community’s current understanding:
References
External links:
- •Forsaken (Roblox): https://www.roblox.com
- •Community Wiki (Forsaken2024): https://forsaken2024.fandom.com/wiki/Forsaken_Wiki

1x1x1x1 as they appear in Forsaken. Image: Forsaken (Roblox) © Forsaken Dev Group, via the Official Forsaken Wiki (forsaken.wiki).
Final Thoughts
If you play 1x1x1x1 like a control killer—information first, denial second, damage third—you’ll feel the match slow down in your favor. Once survivors realize you aren’t gambling, they start making rushed rotations, and that’s where 1x1x1x1 turns “even” games into clean 3K–4K results.
- • Use Unstable Eye to confirm decisions, not to wander.
- • Spend Entanglement only on committed routes.
- • Rotate after hits to keep pressure across the map.
- • Save Rejuvenate for the moment survivors stabilize.
Want the next post to be John Doe, Noli, or Chance?
Related Forsaken Guides
c00lkidd Forsaken Guide 2026: All Abilities, Best Skins & Counter
c00lkidd (coolkid) in Forsaken 2026: all 4 abilities ranked, the projectile combo that ends chases, top 3 skins, and the survivor who hard-counters.
Noob in Forsaken: Survival Guide, Item Timing & Cooldown Management (2026)
Noob guide for Forsaken: when to use Bloxy Cola, Slateskin, and Ghostburger so you stop wasting cooldowns and start escaping consistently.
007n7 in Forsaken: Clone Guide, Teleport Timing & Endgame Escapes (2026)
High-value 007n7 guide for Forsaken: how to clone with purpose, when to teleport safely, and how to convert deception into real objective tempo.
All 7 Forsaken Killers & Abilities 2026: Stats, Counters, Tier
All 7 Forsaken killers in 2026: every ability with cooldowns, wiki speed and HP, tier placement, and the survivor that counters each one. No perks, no filler.
All Forsaken Maps 2026: Every Public & Private-Server Map Explained
All Forsaken maps in 2026 from the Official Forsaken Wiki: the 19 public maps with source game, creators and release version, the 11 private-server maps, 9 variants, and which maps change the objective.
Back to the ForsakenHub homepage for the full Forsaken Roblox guide hub, or browse all guides. You can also play the game directly on Forsaken on Roblox.