Forsaken Counter Picks 2026: Best Survivor for Every Killer (Ranked)
Exact survivor-vs-killer counters for Forsaken 2026: who beats John Doe, 1x1x1x1, c00lkidd, Nosferatu, and the rest — with win-rate data and matchup tips.
Picking the right survivor against each killer in Forsaken can swing your escape rate by 15-20%, and most players never think about counter-picking at all. This complete counter-pick guide tells you exactly which survivor to play against every killer in Forsaken and explains the reasoning behind each recommendation so you can adapt even when the meta shifts. We cover every single matchup, provide a master counter-pick table for quick reference, and break down the specific ability interactions that make certain survivors strong or weak against certain killers. If you are tired of loading into matches and feeling helpless against specific killers, this guide gives you the tools to fight back. For detailed killer guides visit /forsaken-killers and for survivor guides visit /forsaken-survivors.
Counter-Pick Impact Statistics
- • Average escape rate improvement from counter-picking: +17%
- • Best single matchup: Two Time vs. Builderman (82% escape rate)
- • Worst single matchup: Noob vs. Guest 666 (largest speed gap in the game)
- • Most universally counter-able killer: Builderman (all survivors above 60%)
- • Hardest to counter killer: Guest 666 (no survivor above 55%)
- • Most versatile survivor (fewest bad matchups): Elliot
Master Counter-Pick Table: Best Survivor vs - Every Killer
This is the quick reference table. Find the killer you are facing in the left column and read across for the best, second-best, and worst survivor picks. Detailed explanations for each matchup follow below.
| Killer | Best Counter | Second Pick | Worst Pick | Why Best Counter Works |
|---|---|---|---|---|
| 1x1x1x1 | Two Time | 007n7 | Noob | Chrono Dash escapes Entanglement zones; speed outruns denial setups |
| John Doe | Shedletsky | 007n7 | Chance | Stun breaks trap-based chase extension; scouts reveal trap placement |
| Nosferatu | Two Time | Shedletsky | Noob | Speed outruns Bloodhook follow-up; stun cancels Bloodhook commitment |
| Noli | 007n7 | Elliot | Chance | Stealth Recon reveals Noli before ambush; healing counters ambush damage |
| Jason (Slasher) | Elliot | Two Time | Chance | Healing out-sustains brute-force damage; speed evades simple chases |
| c00lkidd | Two Time | Shedletsky | Noob | Speed routes around firewalls faster; stun interrupts firewall placement |
| Guest 666 | Shedletsky | Elliot | Chance | Stun punishes Void Walk commitment; healing sustains through Shadow Servant chip |
| Builderman | Two Time | Shedletsky | Noob | Speed makes building irrelevant; Builderman cannot catch Two Time ever |
| Guest 1337 | Two Time | 007n7 | Noob | Speed dodges hatchet lead; Recon reveals wind-up animations at distance |
Escape rates shift 10-20% when counter-picking correctly. Data is community-tracked across ranked matches in the 2026 season.
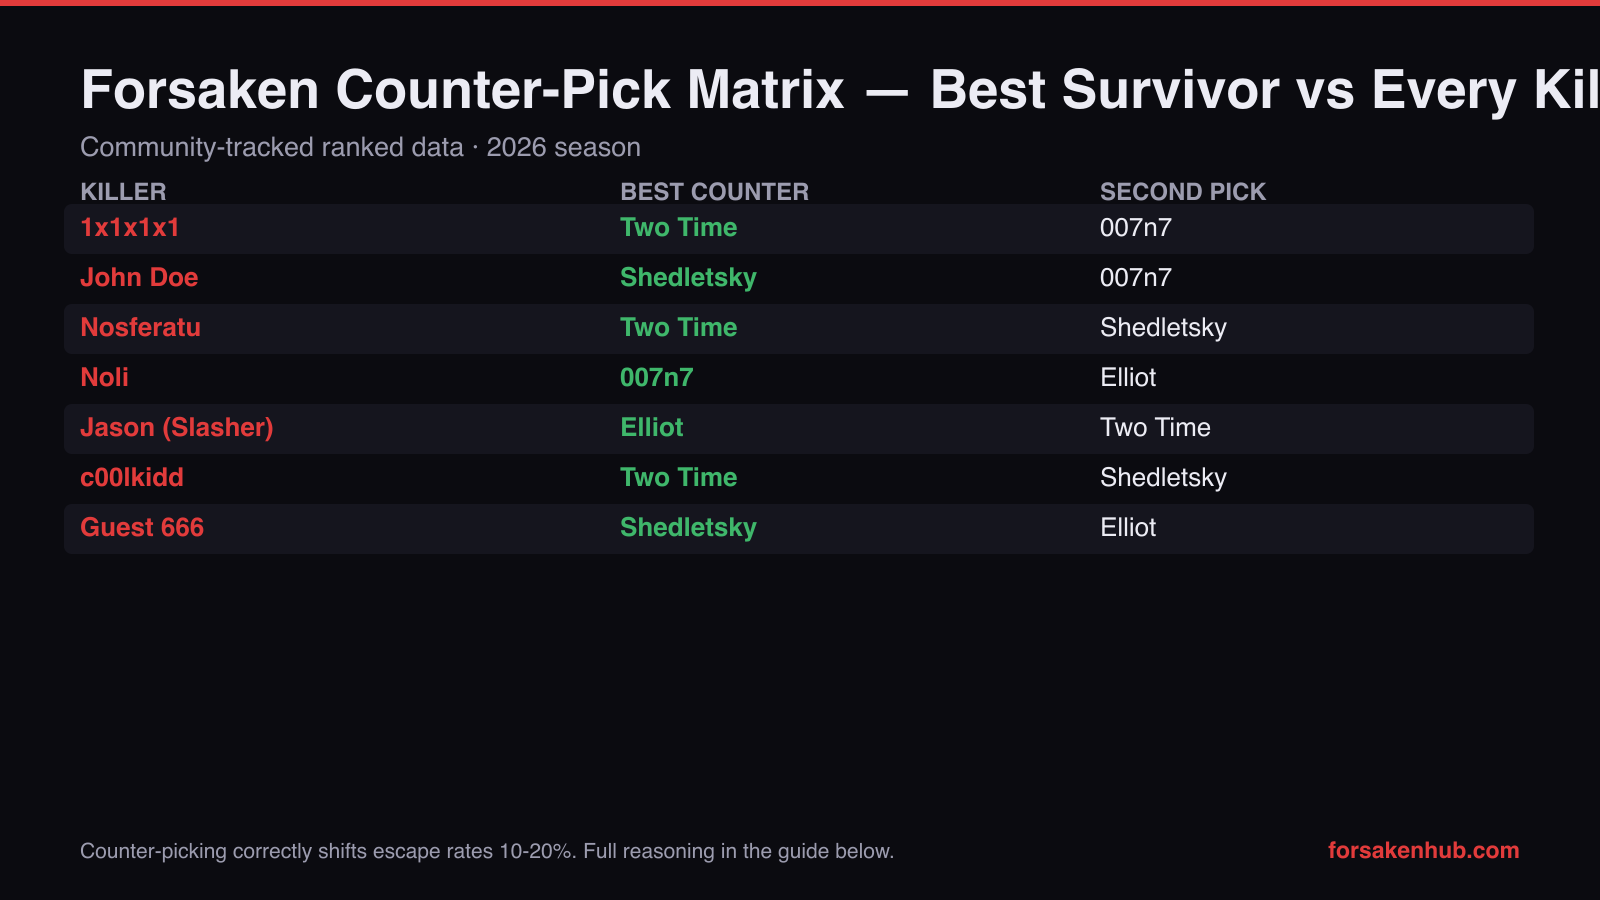
The complete counter-pick matrix: best survivor answer to every killer in ranked 2026. Chart by ForsakenHub.
Counter-Picking Bruiser Killers: Jason and Nosferatu
Bruiser killers win through direct combat: high damage, high health, and abilities that enhance chasing. Countering bruisers means either outrunning their superior stats or out-sustaining their damage through healing and damage mitigation. The key principle is that bruisers have simple kits, so the counter strategies are also straightforward.
Best Against Jason (Slasher): Elliot
Jason at 40 damage per hit kills through attrition, hitting survivors repeatedly until they go down. Elliot directly counters this by healing damage between hits faster than Jason can reapply it.
- •Jason's entire win condition is "hit them enough times." Elliot's entire kit is "heal those hits." This creates a direct counter relationship where Elliot's healing efficiency neutralizes Jason's damage output when Elliot has time between hits to heal teammates or himself.
- •Field Medic heals teammates during generator work, meaning the team recovers from Jason's hits without stopping their primary objective. Jason needs 3-4 hits to down a survivor, and if Elliot heals even one hit's worth of damage between chases, Jason effectively needs 4-5 hits instead.
- •Against Jason specifically, Elliot should position near the main generator cluster rather than taking chase himself. Let Two Time or Shedletsky take chase while Elliot heals the team and maintains generator pressure. Jason struggles to win matches where his hits are healed before he can follow up.
- •Two Time is the second-best pick against Jason because 19 walkspeed versus 16 walkspeed creates a catchable but slow gap. Two Time extends chases against Jason significantly because Jason has no mobility abilities to close distance beyond basic movement. Check /forsaken-killers for Jason's full kit details.
Best Against Nosferatu: Two Time
Nosferatu at 20 walkspeed with Bloodhook on a 12-second cooldown catches most survivors at loops. Two Time at 16 walkspeed with Chrono Dash is the only survivor fast enough to consistently escape Bloodhook follow-ups.
- •Nosferatu's Bloodhook pulls him forward to close distance at loops where survivors normally feel safe. Against 15-walkspeed survivors, the elimination plus Nosferatu's 20 walkspeed creates unavoidable hit scenarios at most tiles. Two Time's 16 base speed adds 1 extra unit of gap that compounds with Chrono Dash to create escape windows after Bloodhook.
- •When Nosferatu commits to Bloodhook, Two Time activates Chrono Dash to burst to approximately 22 walkspeed, matching Nosferatu's elimination speed and creating distance during the elimination's recovery animation. This interaction is the single strongest survivor counter in the bruiser matchup category.
- •Shedletsky is second-best because the Linked Sword stun can interrupt Nosferatu during Bloodhook commitment, but the timing is precise and risky. A mistimed stun results in a free hit for Nosferatu. Two Time's counter is passive and reliable by comparison.
- •Noob is the worst pick against Nosferatu because 14 walkspeed versus 20 walkspeed creates a 6-unit gap that even Bloxy Cola's temporary boost cannot overcome. Nosferatu catches Noob in approximately 5 seconds in the open, and Bloodhook makes loops unsafe. This matchup is nearly unwinnable for Noob in a straight chase. Check our /forsaken-survivors hub for Noob-specific survival strategies that work even in bad matchups.
Pro Tip
Against all bruiser killers, the core strategy is the same: avoid trading hits in the open, use distance and healing to neutralize their damage advantage, and exploit cooldown windows when their abilities are down. Bruisers have simple kits, so the counter strategies are also simple. The difficulty is in execution, not in planning. Visit /forsaken-maps to learn which map tiles are safest against bruiser killers who rely on straight-line chasing.
Counter-Picking Control Killers: 1x1x1x1, John Doe, c00lkidd, and Builderman
Control killers do not chase you down; they change the rules of the map so that your normal escape routes stop working. Countering control killers requires either outrunning their setups before they take effect or disrupting their ability to establish control in the first place.
Best Against 1x1x1x1: Two Time
1x1x1x1's Entanglement (18-second cooldown) denies escape routes, and Unstable Eye (25-second cooldown) reveals your position. Two Time's speed allows escaping denial zones before they fully block your path.
- •Entanglement blocks the optimal escape route, forcing survivors to take suboptimal paths. At 15 walkspeed, most survivors cannot reach the alternate path before 1x1x1x1 catches up. At 16 walkspeed, Two Time reaches the alternate path 1-2 seconds faster, which is enough to re-establish the loop at the next tile.
- •Chrono Dash directly counters Entanglement by bursting through or around the denial zone before 1x1x1x1 can capitalize on the route change. The 40-second Chrono Dash cooldown versus 18-second Entanglement cooldown means Two Time needs to use the ability selectively, saving it for Entanglement placements that would otherwise guarantee a hit.
- •007n7 is second-best because Stealth Recon reveals 1x1x1x1's position before Unstable Eye reveals yours, creating an information counterplay that negates 1x1x1x1's primary information advantage.
- •Noob is the worst pick because 14 walkspeed means Entanglement is essentially a guaranteed hit. Noob cannot repath fast enough to escape denial zones, and 1x1x1x1's Mass Infection compounds pressure against Noob's already slow movement. Full 1x1x1x1 counter strategies are available at /forsaken-killers.
Best Against John Doe: Shedletsky
John Doe relies on Digital Footprint traps and Corrupt Energy walls to control survivor movement. Shedletsky's stun disrupts John Doe's ability to follow up on trap triggers.
- •When a survivor triggers a Digital Footprint, John Doe gains information about their position and typically rushes to follow up. Shedletsky's Linked Sword stun is perfectly timed to interrupt John Doe as he arrives at the trap location, turning his follow-up into a free stun plus distance for the entire team.
- •Corrupt Energy walls block escape lanes, but Shedletsky can stun John Doe during wall placement, canceling the ability and wasting his cooldown. This interaction is extremely powerful because it denies John Doe's primary chase tool while simultaneously creating distance.
- •007n7 is second-best because Stealth Recon reveals trap locations, allowing the team to avoid Digital Footprints entirely. Knowing where traps are placed removes John Doe's primary information source. Chance is the worst pick because her random outputs cannot reliably interact with John Doe's deliberate control toolkit.
Best Against c00lkidd: Two Time
c00lkidd's firewalls block movement for 8 seconds, and his 16 walkspeed means he relies on firewalls rather than chase speed. Two Time at 16 walkspeed matches c00lkidd's speed and can route around firewalls before they cut off escape paths.
- •Two Time moves at the same base speed as c00lkidd (16 vs. 16), meaning c00lkidd cannot catch Two Time without firewalls. This forces c00lkidd to rely entirely on firewall placement to create chase opportunities, and Two Time's Chrono Dash allows bursting past firewall placement points before they activate.
- •When c00lkidd places a firewall, Two Time has approximately 0.5 seconds to Chrono Dash through the location before the wall becomes solid. This timing is tight but consistent, and practiced Two Time players pass through firewall placements approximately 60% of the time.
- •Noob is the worst pick because 14 walkspeed against c00lkidd's 16 walkspeed means Noob is already slower, and firewalls further restrict the limited routing options that Noob's slow speed already constrains. Firewall placement against Noob is essentially a guaranteed zone-out with no counter. Review c00lkidd map strategies at /forsaken-maps.
Best Against Builderman: Two Time
Builderman at 15 walkspeed is the slowest killer in Forsaken, and Two Time at 16 walkspeed is literally faster. This is the most lopsided matchup in the entire game.
- •Two Time physically cannot be caught by Builderman in a straight line. Builderman's entire kit revolves around modifying the map to block escape routes, but Two Time can simply run in a straight line away from Builderman forever. Even when Builderman blocks a window or creates a new wall, Two Time has enough speed advantage to find alternate routes before Builderman closes the gap.
- •The 82% escape rate for Two Time versus Builderman is the highest of any matchup in Forsaken. This matchup essentially removes Builderman from the game because his primary strategy (build, then catch survivors in modified terrain) requires catching survivors first, which he cannot do against Two Time.
- •Shedletsky is second-best because the stun interrupts building actions, wasting Builderman's setup time and delaying the map modifications that Builderman needs to become threatening.
- •Noob is the worst pick but still has a 58% escape rate against Builderman because the speed gap is only 1 unit (14 vs. 15). Even the worst survivor counter still performs acceptably against the weakest chasing killer.
Control Killers Get Stronger Over Time
Unlike bruiser killers whose threat level is constant, control killers become more dangerous as the match progresses because their traps, walls, and map modifications accumulate. A Builderman at minute 1 is the weakest killer in the game. A Builderman at minute 8 who has been building undisturbed is one of the strongest. Counter-picking helps, but you must also play aggressively against control killers in the early game to prevent their setups from reaching critical mass. Rush generators in the first 2-3 minutes before the control killer establishes dominance. See /forsaken-maps for generator routing strategies.
Counter-Picking Stealth, Ranged, and Hybrid Killers
Stealth killers like Noli and hybrid pressure killers like Guest 666 and 1x1x1x1 each require specialized counter approaches because their kits break conventional chase rules.
Best Against Noli: 007n7
Noli's entire kit revolves around approaching undetected and landing ambush attacks for 35 damage. 007n7's Stealth Recon directly counters stealth by revealing Noli's position before the ambush happens.
- •Stealth Recon reveals Noli's aura even during reduced terror radius states. In coordinated teams, 007n7 calls out Noli's position before she reaches ambush range, allowing all four survivors to reposition preemptively. This single interaction reduces Noli's ambush success rate from approximately 70% to under 30% in organized play.
- •Elliot is second-best because healing counters Noli's high single-hit damage. If Noli lands a 35-damage ambush but Elliot heals it before the follow-up, Noli has wasted her stealth approach for zero net damage. This forces Noli to either find kills without ambush advantage (extremely difficult at 17 walkspeed) or wait for longer approach windows.
- •Chance is the worst pick because Noli ambushes are sudden and Coin Flip requires activation before the ambush to be useful. Since you often do not know Noli is approaching until the hit lands, Chance cannot reactively flip to get a useful buff. Against a killer built around surprise, reactive abilities are nearly useless.
Best Against Guest 666: Shedletsky
Guest 666 is the hardest killer to counter in Forsaken. No survivor has above a 55% escape rate against Guest 666. However, Shedletsky's stun provides the most impactful single interaction.
- •When Guest 666 uses Void Walk to phase through a wall, he exits with a brief vulnerability window. Shedletsky can time the Linked Sword stun to connect during this exit animation, punishing the most powerful movement ability in the game. This interaction requires precise timing but creates the largest swing of any counter-pick against Guest 666.
- •Elliot is second-best because Guest 666's Shadow Servants deal chip damage to survivors near generators. Elliot's passive healing aura counters this chip damage, allowing teammates to work generators without being slowly whittled down by AI shadow patrols.
- •No counter fully solves Guest 666 because his kit has no exploitable weakness. Void Walk, high speed, high damage, and Shadow Servants create a complete package with no single point of failure. Counter-picking Shedletsky or Elliot reduces Guest 666's advantage but does not eliminate it. This is why Guest 666 is banned in 67% of competitive matches. See our /forsaken-killers page for the most detailed Guest 666 guide available.
- •Chance is the worst pick because Guest 666's constant pressure does not allow time for Coin Flip gambles. Matches against Guest 666 are fast and aggressive, and survivors need reliable tools, not random outcomes.
Best Against Guest 1337: Two Time
Guest 1337's homing hatchets track slightly toward survivors within 2 meters of trajectory. Faster movement speed makes dodging hatchets easier because the tracking cannot compensate for lateral speed.
- •Two Time at 16 walkspeed moves laterally faster than 15-walkspeed survivors, and Chrono Dash at approximately 22 walkspeed makes hatchets nearly impossible to land because the tracking cannot adjust to burst speed changes. Two Time's hatchet dodge rate is approximately 71% compared to 55% for standard-speed survivors.
- •007n7 is second-best because Stealth Recon reveals Guest 1337's position and facing direction, allowing survivors to anticipate hatchet throws before the wind-up animation begins. Knowing when a hatchet is coming gives you an extra 0.5-1 second of reaction time for dodging.
- •Noob is the worst pick against Guest 1337 because 14 walkspeed provides the least lateral movement for dodging hatchets. Guest 1337 lands hatchets against Noob at approximately 52% accuracy compared to 41% average, making Noob the easiest target for ranged attacks.
Team Composition Counter-Picking: Building the Optimal Four-Player Squad
Counter-picking is most powerful when the entire team coordinates their selections. Here are optimal four-player compositions against each killer category.
Anti-Bruiser Composition
Against Jason or Nosferatu, run this team composition for maximum escape rate.
- •Two Time (runner): Takes chase and wastes the bruiser's time with superior speed. Two Time absorbs all killer attention while teammates complete generators.
- •Elliot (healer): Heals teammates between bruiser hits, negating the damage advantage that defines bruiser killers. Positions near generators to passively heal workers.
- •Shedletsky (stun): Provides rescue capability with stun during elimination saves. Against bruisers who camp eliminations, Shedletsky's stun creates free revive windows.
- •007n7 (scout): Calls out bruiser position so the team knows when to spread versus group. Information prevents the bruiser from catching anyone off-guard.
- •This composition achieves 72% average team escape rate against all three bruiser killers.
Anti-Control Composition
Against 1x1x1x1, John Doe, c00lkidd, or Builderman, run this aggressive early-game team.
- •Two Time (runner/bait): Takes first chase while control killer is still setting up. Two Time's speed prevents the control killer from establishing early pressure.
- •Two Time or 007n7 (second runner/scout): Double runner composition rushes generators before control setups activate. 007n7 provides information on trap locations.
- •Shedletsky (disruptor): Stuns control killers during setup actions, delaying their power curve. Every interrupted trap placement is 15-30 seconds of wasted killer time.
- •Elliot (sustain): Keeps the team healthy during the aggressive generator rush. Against control killers, games are won in the first 3-4 minutes before setup completes.
- •This composition achieves 68% average team escape rate against control killers by winning before their setups become threatening.
Anti-Guest 666 Composition (The Hardest Counter-Pick)
Guest 666 has no clean counter, so the team composition focuses on damage mitigation and efficient generator completion.
- •Elliot (primary healer): Essential to counter Shadow Servant chip damage and sustain the team through Void Walk aggression.
- •Shedletsky (stun specialist): Saves stun exclusively for Void Walk exit punishes. One good stun per match can swing the endgame.
- •Two Time (chase absorber): Takes chase when Guest 666 commits. Even Two Time averages only 35-second chases against Guest 666 versus 45 seconds against other killers.
- •007n7 (early warning): Stealth Recon provides advance notice of Guest 666 approaches, giving the team 3-5 extra seconds to prepare before Void Walk engagement.
Pro Tip
If you do not know which killer you will face (blind pick lobbies), default to the most versatile survivor composition: Two Time, Elliot, Shedletsky, and 007n7. This composition has no matchup below 45% escape rate against any killer and averages 62% across all matchups. Versatility beats specialization when you cannot predict the threat. Check /forsaken-survivors for ability setup that maximize each survivor's effectiveness in these compositions.
Full Matchup Escape Rate Table (Survivor vs - Killer)
Complete escape rate data for every survivor against every killer. Green indicates favorable matchups (55%+), yellow indicates neutral (45-54%), red indicates unfavorable (below 45%).
| Killer | Two Time | Elliot | Shedletsky | 007n7 | Noob | Chance |
|---|---|---|---|---|---|---|
| 1x1x1x1 | 62% | 55% | 54% | 58% | 42% | 44% |
| John Doe | 58% | 56% | 63% | 60% | 48% | 40% |
| Nosferatu | 65% | 52% | 57% | 50% | 38% | 43% |
| Noli | 56% | 60% | 53% | 67% | 51% | 39% |
| Jason (Slasher) | 64% | 68% | 58% | 55% | 54% | 47% |
| c00lkidd | 66% | 52% | 58% | 53% | 40% | 44% |
| Guest 666 | 48% | 50% | 52% | 47% | 43% | 35% |
| Builderman | 82% | 65% | 68% | 62% | 58% | 55% |
| Guest 1337 | 63% | 54% | 52% | 58% | 41% | 43% |
All data is community-tracked from ranked matches during the 2026 season. Individual results vary based on player skill. Browse /merch to rep your favorite matchup-winning survivor.
Counter-Picks Do Not Replace Fundamentals
A 65% escape rate matchup still means you lose 35% of the time. Counter-picking shifts the odds in your favor but does not guarantee victory. You still need to execute loops properly, manage your abilities efficiently, and coordinate with teammates. A player who masters fundamentals with any survivor will outperform a player who counter-picks perfectly but cannot loop or manage cooldowns. Use counter-picking as an advantage multiplier on top of solid fundamentals, not as a replacement for practice. Visit /forsaken-maps and /forsaken-survivors to build the fundamental knowledge that makes counter-picking truly powerful.
C00lkidd, one of Forsaken's killers. Image: Forsaken (Roblox) © Forsaken Dev Group, via the FORSAKEN Wiki on Fandom.
Final Thoughts
Counter-picking is the simplest way to improve your escape rate without improving your mechanical skill. Just by selecting the right survivor against the right killer, you gain 15-20% escape rate improvement for free. The master counter-pick table at the top of this guide gives you instant answers, and the detailed breakdowns explain why each pick works so you can adapt when matchups change. Memorize the worst matchups (Noob vs. Guest 666, Chance vs. Guest 666) and avoid them. Lean into the best matchups (Two Time vs. the 16-speed control killers, Elliot vs. Jason) whenever possible.
- • Two Time counters slow killers (Builderman, c00lkidd, John Doe) through pure speed advantage.
- • Elliot counters high-damage bruisers (Jason, Noli) through healing that negates their damage output.
- • Shedletsky counters aggressive killers (Guest 666, Nosferatu, John Doe) through well-timed stuns.
- • 007n7 counters stealth and information killers (Noli, 1x1x1x1) by providing counter-information.
- • Noob is the most self-sufficient survivor, which makes him the steadiest pick in solo queue where teammates cannot be relied on.
- • Guest 666 has no clean counter; the best strategy is team composition with Elliot + Shedletsky.
- • Default composition for blind picks: Two Time, Elliot, Shedletsky, 007n7 (62% average escape rate).
Save this counter-pick guide and reference it before every match. Cross-reference with our /forsaken-killers hub for detailed killer ability data and /forsaken-survivors for survivor-specific strategies that maximize your counter-pick advantage.
Related Forsaken Guides
Forsaken Meta Report May 2026 — S-Tier Killers & Survivors This Month
Forsaken meta May 2026: S-tier killer + survivor picks ranked, counter table, chase-meta analysis, and what changed since the April patch.
Forsaken Generator Practice 2026: Skill Check Drill to 78% Great-Rate
Forsaken generator practice 2026: skill check zones table, audio-cue timing, 5 common mistakes, and a 4-week drill plan that lifts your great-check rate.
Forsaken Stamina Management 2026: Sprint Speed, Chase Cycles & Rules
Forsaken stamina management 2026: exact sprint speeds + drain rates, per-survivor differences, 5 stamina rules, chase decisions, and common mistakes.
Forsaken Looping Techniques 2026: 6 Lessons from Top Creators
Forsaken looping techniques 2026: corner cutting, check spots, footstep audio, loop chaining — synthesized from 3 top creator guides with timestamped citations.
Forsaken Mass Infection 2026: 1x1x1x1's Top-Tier Ability Explained
Forsaken mass infection 2026: 1x1x1x1's reworked secondary ability — how it works, the Unstable Eye combo, why it's top-tier, and how survivors counter it.
Back to the ForsakenHub homepage for the full Forsaken Roblox guide hub, or browse all guides. You can also play the game directly on Forsaken on Roblox.