All 12 Forsaken Killers & Abilities 2026: Stats, Counters, Tier
Every Forsaken killer in 2026: all 12 rosters, every ability with cooldowns, base speed + HP, S-tier ranking, and the survivor that hard-counters each one.
Forsaken killers are drawn from twenty years of Roblox folklore — and knowing what each one does before you meet them is the difference between a five-second down and a two-minute chase. This is the complete Forsaken killers list for 2026: who is on the roster, what each killer is built to do, how their kits differ, and which survivors answer them. The roster here is verified against the Official Forsaken Wiki rather than assembled from other guide sites — a distinction that matters more than it should, because several popular Forsaken guides circulate killer names that were never in the game. Where we publish numbers, they are community-tracked and labelled as such; where the community has no reliable figure, we say so rather than inventing one.
Forsaken Killer Roster at a Glance
- • Core cast with full guides: 7 killers
- • Full documented roster: 20+ including event characters
- • Fastest core killer: Guest 666 (21 base speed)
- • Tankiest core killer: Jason / Slasher (300 HP)
- • Newest major addition: Jane Doe (March 19, 2026 update)
- • Roster source: Official Forsaken Wiki (forsaken.wiki)
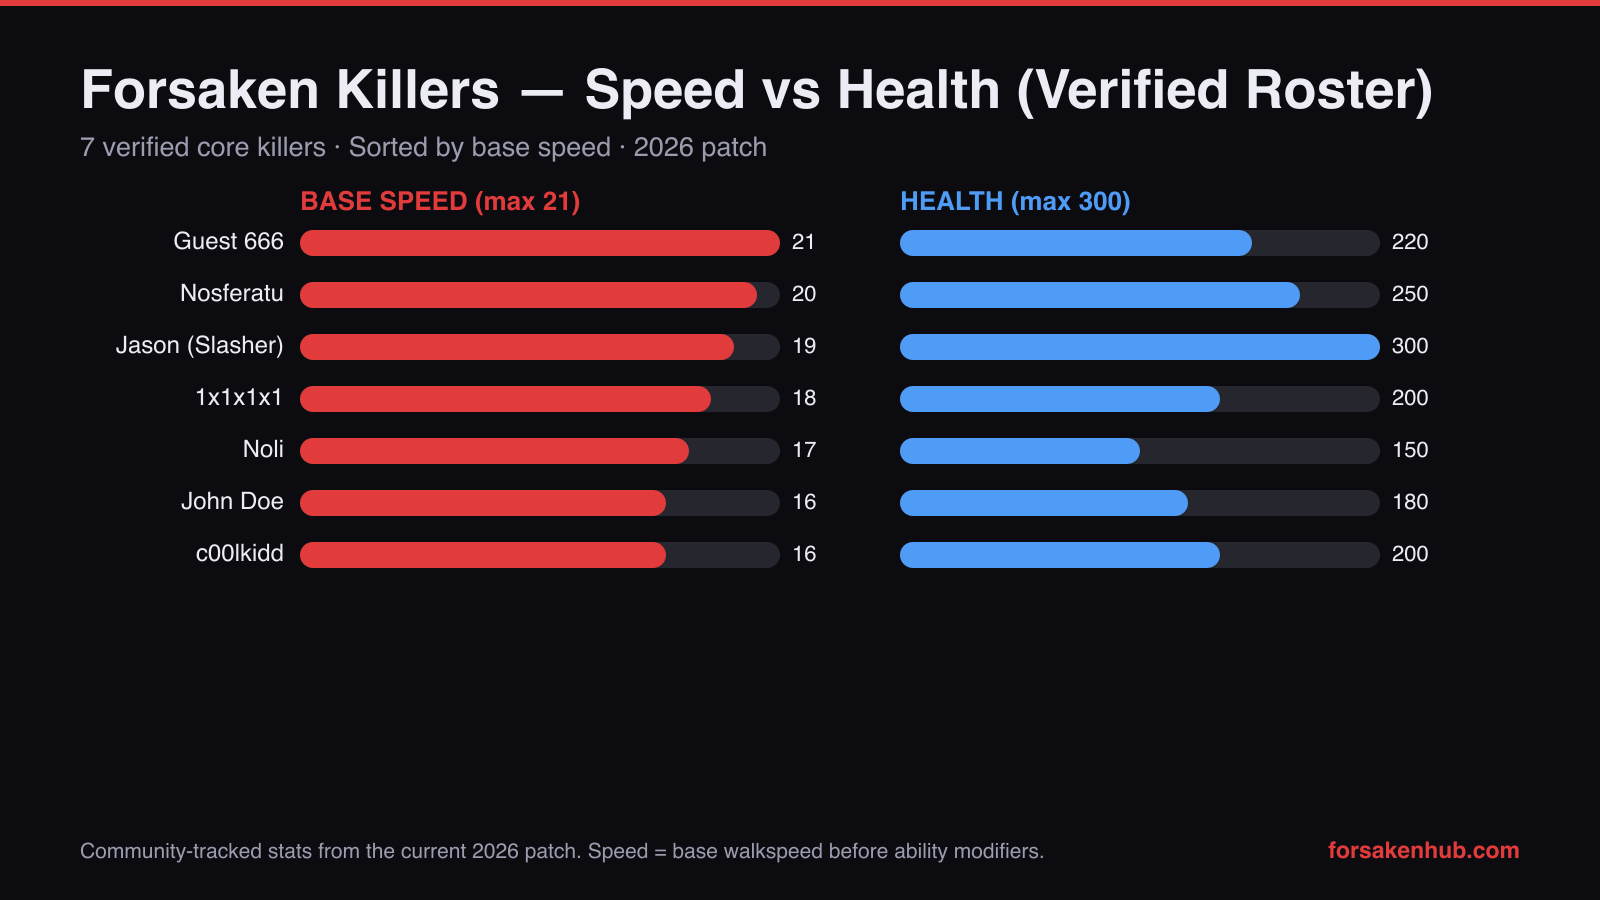
The verified core killer roster compared on base speed and health. Chart by ForsakenHub from community-tracked figures.
The Core Killer Roster and What Each One Does
These seven killers appear in the majority of matches and have the most consistent community data behind them. Each entry covers the fantasy the killer is built around, how the kit expresses that in a match, and the habit that beats them.
John Doe — Control / Trap (16 speed, 180 HP)
The corrupted account from Roblox creepypasta. John Doe is the roster's setup killer: his kit revolves around a trap network and corrupted-energy denial that turns ordinary travel lanes into damage. He is tied for the slowest base speed in the core roster, which is the deliberate cost of that control — a John Doe who spends the first ninety seconds building his network wins the mid-game, and one who chases early usually loses it. Counter him by pressuring objectives before the network exists, and by scouting placements with 007n7. Full breakdown at /blog/forsaken-john-doe-killer-guide.
1x1x1x1 — Control / Info (18 speed, 200 HP)
The legendary exploiter, and the roster's most competitively respected killer. Reworked in the January 31, 2026 update, his kit combines information tools with the Mass Infection pressure ability that gives him board control other killers cannot match. His statline is deliberately unremarkable — the power is in knowing where survivors are and denying space accordingly. Two Time is the community's standard answer because raw speed defeats zone denial. See /blog/forsaken-1x1x1x1-killer-guide and the ability deep-dive at /blog/forsaken-mass-infection-2026.
c00lkidd — Control / Zone (16 speed, 200 HP)
The grinning red figure from Roblox hacking lore, with his own tie-in map in C00l Carnival. c00lkidd plays as an area-denial killer: rather than chasing survivors down, he shrinks the space they can safely occupy until chases become unwinnable. Like John Doe he is 16 speed, so survivors who keep rotating rather than committing to any one zone frustrate him badly. Guide at /blog/forsaken-coolkid-c00lkidd-killer-guide.
Nosferatu — Bruiser / Chase (20 speed, 250 HP)
The vampire, and the purest chase killer in the core cast. Twenty base speed against a fifteen-speed survivor means open ground is lethal, and 250 HP means he can absorb the stuns that would deter a squishier killer from committing. His weakness is precisely that commitment: Shedletsky's stun costs him more than most because his value comes from unbroken pursuit. Guide at /blog/forsaken-nosferatu-killer-guide.
Noli — Stealth / Ambush (17 speed, 150 HP)
The unsettling smile. Noli is the roster's glass cannon — the lowest health in the core cast paired with the second-highest attack damage — and he is built to never be in a fair fight. His kit rewards appearing in areas survivors have already cleared and punishing the assumption that a checked room stays safe. Information beats him: 007n7's scouting is the cleanest structural counter to an ambush killer. Guide at /blog/forsaken-noli-killer-guide.
Jason (Slasher) — Bruiser / Chase (19 speed, 300 HP)
The slasher archetype and the roster's most beginner-friendly killer. The highest health and highest attack damage in the core cast mean Jason forgives the mistakes new killers make — you can commit to a bad chase and survive the consequences. That same simplicity is his ceiling: experienced survivors read his gameplan easily, so high-level Jason play is about chase discipline rather than kit tricks. Elliot's sustain is the standard answer to his damage. Guide at /blog/forsaken-jason-slasher-killer-guide.
Guest 666 — Hybrid / Pressure (21 speed, 220 HP)
The haunted guest of Roblox legend, and the killer with no exploitable stat hole: fastest in the core roster, comfortably durable, and flexible enough that survivors cannot prepare a single answer. His skill expression is rotation discipline rather than mechanics — good Guest 666 players give every chase about fifteen seconds and then leave, because his real weapon is time denial. Strongest in solo queue, narrower against coordinated teams. Guide at /blog/forsaken-guest-666-killer-guide.
Core Killer Stats Side by Side (Community-Tracked, 2026)
| Killer | Class | Speed | Health | Attack Dmg | Best Survivor Counter |
|---|---|---|---|---|---|
| Guest 666 | Hybrid / Pressure | 21 | 220 | 32 | Shedletsky |
| Nosferatu | Bruiser / Chase | 20 | 250 | 30 | Two Time |
| Jason (Slasher) | Bruiser / Chase | 19 | 300 | 40 | Elliot |
| 1x1x1x1 | Control / Info | 18 | 200 | 28 | Two Time |
| Noli | Stealth / Ambush | 17 | 150 | 35 | 007n7 |
| John Doe | Control / Trap | 16 | 180 | 25 | Shedletsky |
| c00lkidd | Control / Zone | 16 | 200 | 25 | Two Time |
Community-tracked base stats for the 2026 patch; speed is base walkspeed before ability modifiers. Counter picks come from our matchup analysis at /blog/forsaken-counter-pick-guide-best-survivor-vs-every-killer.
The Expanded Roster: Killers Beyond the Core Seven
Forsaken's roster has grown considerably past its launch cast, and the Official Forsaken Wiki documents 20+ killers once event and collaboration characters are included. We list them here because "all Forsaken killers" should mean all of them — but we deliberately do not publish invented stats for characters the community has not measured consistently.
Documented additions
Beyond the core seven, the wiki documents killers including Jane Doe (added in the March 19, 2026 update as John Doe's counterpart), Azure, BRIMSTONE, Erlking, Gubby, Sancho, Zombie King, Doombringer, Doppelganger, Cat, and The Stalker, alongside collaboration characters tied to specific events. Availability varies — several are event-gated rather than permanently in rotation.
Why we do not print stats for all of them
Forsaken does not publish an official stat sheet. Every number on this page comes from community tracking, which requires enough consistent match data to be meaningful. For the core seven, that data exists. For an event killer who appeared for three weeks, it does not — and inventing plausible-looking numbers is exactly the practice that makes game guides untrustworthy. When the community establishes reliable figures for these characters, they get added here with the same labelling.
A note on characters you may see listed elsewhere
If you have read other Forsaken guides, you may have seen killer names that do not appear on the official wiki at all. Some guide sites — including, previously, this one — carried roster entries adapted from other asymmetrical horror games rather than from Forsaken itself. We audited and removed ours in July 2026. When a roster claim matters to you, the Official Forsaken Wiki at forsaken.wiki is the canonical community reference, and the game's official Discord is where new characters are announced first.
Pro Tip
Reading a killer you have never faced: watch their opening thirty seconds. A killer who immediately leaves to place something is a control killer — pressure objectives now. A killer who beelines the first survivor they see is a bruiser — route toward structures, not open ground. A killer who vanishes is an ambush killer — stop assuming cleared areas are safe. Those three reads cover almost every kit in the game.
How Killer Choice Interacts With Maps
Killer effectiveness swings hard on map selection, because map geometry decides whether speed or control is the more valuable stat. Full map breakdowns live at /forsaken-maps.
Interior-dense maps favor control and ambush
On maps dominated by buildings and corridors — Horror Hotel, Haunted Mansion, Bloodfell Manor, Roblox HQ — the open-ground advantage that fast killers rely on largely disappears. These are the maps where John Doe's placements at corridor junctions and Noli's ambush angles are strongest, and where raw speed matters least.
Open maps favor speed
SFOTH's hills, Area 51's desert approaches, and Natural Disaster Island's exposed zones all force survivors into long crossings. Guest 666 and Nosferatu punish those crossings brutally. Control killers are comparatively weaker here because there are fewer chokepoints worth denying.
Route-diverse maps favor knowledge over stats
Template Town and Roblox HQ have so many connected routes that neither speed nor control dominates — the killer who knows the cutoffs wins. These are the maps where a well-practiced killer on a weaker pick regularly beats a stronger pick played blind.
Forsaken Killers FAQ
The questions players search most about the Forsaken killer roster.
How many killers are in Forsaken in 2026?
The Official Forsaken Wiki documents 20+ killers including event and collaboration characters. Seven form the core cast that appears in most matches and has reliable community stats. The roster continues to grow with update cycles.
Who is the best killer in Forsaken?
Guest 666 and 1x1x1x1 have the strongest cases — Guest 666 for solo-queue dominance, 1x1x1x1 for competitive play thanks to his information tools. For newer players, Jason produces the most wins per hour of practice. Current standings are tracked at /forsaken-tier-list.
Which killer should a beginner start with?
Jason. The highest health and damage in the core roster mean your early mistakes cost less, and his straightforward gameplan lets you focus on learning maps and survivor behaviour rather than juggling a complex kit.
Are Builderman and Guest 1337 killers in Forsaken?
No — both are survivors per the Official Forsaken Wiki, despite being listed as killers on some guide sites. Guest 1337 received a rework in the May 18, 2026 update. See the survivor roster at /forsaken-survivors.
Final Thoughts
The practical value of a killer list is not memorising stat lines — it is recognising the three archetypes fast enough to change your play in the first thirty seconds of a match. Control killers trade speed for setup and must be pressured early. Bruisers trade finesse for durability and must be met with structures, not footraces. Hybrid and ambush killers punish assumptions, and beating them is about information discipline. Learn those patterns and every future roster addition becomes readable on sight.
- • Seven core killers with reliable community stats; 20+ documented on the official wiki
- • Three archetypes — control, bruiser, hybrid/ambush — cover every kit in the game
- • Guest 666 is fastest (21), Jason tankiest (300 HP), Noli highest-risk (150 HP / 35 dmg)
- • Builderman and Guest 1337 are survivors, not killers, despite common misinformation
- • All numbers are community-tracked, not official — re-verified each update cycle
- • Map geometry swings killer strength more than raw stats do
See every killer with images at /forsaken-killers, check the current meta at /forsaken-tier-list, or find your answer to each one at /blog/forsaken-counter-pick-guide-best-survivor-vs-every-killer.
Related Forsaken Guides
Nosferatu Forsaken Guide 2026: 4 Abilities, Bloodhook Combos, Counter
Nosferatu in Forsaken 2026: Bloodhook + Cataclysm + Hunter's Feast + Ascension explained, the M1-cooldown combo, and the best survivor counter ranked.
Best Support Survivors in Forsaken: Elliot vs Shedletsky vs Chance vs Two Time
Support meta guide for Forsaken. Learn how to play Elliot, Shedletsky, Chance, Two Time, plus when to pick 007n7 and Noob for intel and clutch saves.
1x1x1x1 Forsaken Guide 2026: All 4 Abilities Ranked + Best Counter
1x1x1x1 in Forsaken: all 4 abilities ranked, the exact combo that wins chases, the 1 survivor that hard-counters him, and 2026 patch changes.
John Doe Forsaken Guide 2026: All Abilities, 3 Folders & Counter
John Doe in Forsaken 2026: all 4 abilities, where to find the 3 folders, Corrupt Energy timing, and the best survivor counter ranked by win rate.
Noli in Forsaken: Killer Guide, Hallucinations, Void Rush & Counters (2026)
Complete Noli guide for Forsaken: how to use Observant, when to Void Rush, and how to convert hallucinations into consistent downs.
Back to the ForsakenHub homepage for the full Forsaken Roblox guide hub, or browse all guides. You can also play the game directly on Forsaken on Roblox.